


|
|
|
|
The programs in the two previous chapters consist of a number of instructions which are executed one by one, from start to finish.
However, there are a number of other ways a program can proceed:
Section Contents
The DO...UNTIL and WHILE...ENDWH commands are structures - they don’t actually do anything to your data, but control the order in which other commands are executed:
DO...UNTIL repeats a set of instructions until a certain condition is true.
WHILE...ENDWH repeats a set of instructions so long as a certain condition is true.
There is a test condition at the end of the DO...UNTIL loop, and at the beginning of the WHILE...ENDWH loop.
    PROC test:
          LOCAL a%
          a%=10
          DO
                PRINT "A=";a%
                a%=a%-1
          UNTIL a%=0
          PRINT "Finished"
          GET
    ENDP
The instruction DO says to OPL:
"Execute all the following instructions until an UNTIL is reached. If the condition following UNTIL is not met, repeat the same set of instructions until it is."
The first time through the loop, a%=10. 1 is subtracted from a%, so that a% is 9 when the UNTIL statement is reached. Since a% isn’t zero yet, the program returns to DO and the loop is repeated.
a% goes down to 8, and again it fails the UNTIL condition. The loop therefore repeats 10 times until a% does equal zero.
When a% equals zero, the program continues with the instructions after UNTIL.
The statements in a DO...UNTIL loop are always executed at least once.
    PROC test2:
          LOCAL a%
          a%=10
          WHILE a%>0
                PRINT "A=";a%
                a%=a%-1
          ENDWH
          PRINT "Finished"
          GET
    ENDP
The instructions between the WHILE and ENDWH statements are executed only if the condition following the WHILE is true - in this case if a% is greater than 0.
Initially, a%=10 and so A=10 is displayed on the screen. a% is then reduced to 9. a% is still greater than zero, so A=9 is displayed. This continues until A=1 is displayed. a% is then reduced to zero, and so Finished is displayed.
Unlike DO...UNTIL, it’s possible for the instructions between WHILE and ENDWH not to be executed at all.
    PROC newkey:
          WHILE KEY :ENDWH
          PRINT "Press a new key."
    ENDP
This procedure ignores any keys which may already have been typed, then waits for a new keypress.
KEY returns the value of a key that was pressed, or 0 if no key has been pressed. WHILE KEY :ENDWH reads any keys previously pressed, one by one, until they have all been read and KEY returns zero.
Section Contents
In a program, you might have several possible cases (x% may be 1, or it may be 2, or 3...) and want to do something different for each one (if it’s 1, do this, but if it’s 2, do that...). You can do this with the IF...ENDIF structure:
    IF condition1
          do these statements
    ELSEIF condition2
          do these statements
    ELSEIF condition3
          do these statements
    .
    .
    ELSE
          do these statements
    ENDIF
These lines would do either
or
or
and then continue with the statements after the ENDIF.
You can cater for as many cases as you like with ELSEIF statements. You don’t have to have any ELSEIFs. There may be either one ELSE statement or none; you do not specify conditions for the ELSE statement.
Every IF in your program must be matched by an ENDIF - otherwise you’ll see an error message when you try to translate the module. The structure must start with an IF and end with an ENDIF.
You can have up to eight DO...UNTIL, WHILE...ENDWH and/or IF...ENDIF structures nested within each other. If you nest them any deeper, a ‘Too complex’ error message will be displayed.
    PROC zcode:
          LOCAL g%
          PRINT "Are you going to press Z?"
          g%=GET
          IF g%=%Z OR g%=%z
                PRINT "Yes!"
          ELSE
                PRINT "No."
          ENDIF
          PAUSE 60
    ENDP
The program checks character codes with the % operator. %a returns the code of a, %Z the code of Z and so on. Using %A is entirely equivalent to using 65, the actual code for A, but it saves you having to look it up, and it makes your program easier to follow.
Be careful not to confuse character codes like these with integer variables.
OR lets you check for either of two conditions. OR is an example of a logical operator. There is more about logical operators later in this chapter.
    PROC testny:
          DO
            g$=UPPER$(GET$)
          UNTIL g$="N" OR g$="Y"  REM wait for a Y or N
          IF g$="N"               REM was it an N?
              ...                 REM ‘N’ pressed
          ELSE                    REM must have been a Y
              ...                 REM ‘Y’ pressed
          ENDIF
    ENDP
This procedure checks for a ‘Y’ or ‘N’ keypress. You’d put your own code in the IF statement, where ... has been used.
Some functions, as with commands like PRINT and PAUSE, require you to give a value or values. These values are called arguments. The UPPER$ function needs you to specify a string argument, and returns the same string but with all letters in upper case. For example, UPPER("12.+aBcDeF") returns 12.+ABCDEF.
Since GET$ returns a string, you can use this as the argument for UPPER$. UPPER$(GET$) waits for you to press a key, because of the GET$; the UPPER$ takes the string returned and, if it’s a letter, returns it in upper case. This means that you can check for Y without having to check for y as well.
The test condition used with DO...UNTIL, WHILE...ENDWH and IF...ENDIF can be any expression, and may include any valid combination of operators and functions. Examples:
|
Condition |
Meaning |
|
x=21 |
does the value of x equal 21? (Note - as this is a test condition, it does not assign x the value 21) |
|
a%<>b% |
is the value of a% not equal to the value of b%? |
|
x%=(y%+z%) |
is the value of x% equal to the value of y%+z%? (does not assign the value y%+z% to x%). |
The expressions actually return a logical value - that is, a value meaning either ‘True’ or ‘False’. Any non-zero value is considered ‘True’ (to return a ‘True’ value, OPL uses -1), while zero means ‘False’. So if a% is 6 and b% is 7, the expression a%>b% will return a zero value, since a% is not greater than b%.

|
Constants for ‘True’ and ‘False’ are given in Const.oph. See the ‘Calling Procedures’ chapter for details of how to use this file and see Appendix E for a listing of it. |
These are the conditional operators:
|
< |
less than |
|
> |
greater than |
|
= |
equal to |
|
<= |
less than or equal to |
|
>= |
greater than or equal to |
|
<> |
not equal to |
The operators AND, OR and NOT allow you to combine or change test conditions. This table shows their effects. (c1 and c2 represent conditions.)
|
Example |
Result |
Integer returned |
|
c1 AND c2 |
True if both c1 and c2 are true |
-1 |
|
|
False if either c1 or c2 are false |
0 |
|
c1 OR c2 |
True if either c1 or c2 is true |
-1 |
|
|
False if both c1 and c2 are false |
0 |
|
NOT c1 |
True if c1 is false |
-1 |
|
|
False if c1 is true |
0 |
However, AND, OR and NOT become bitwise operators - something very different from logical operators - when used exclusively with integer or long integer values. If you use IF A% AND B%, the AND acts as a bitwise operator, and you may not get the expected result. You would have to rewrite this as IF A%<>0 AND B%<>0. (Operators, including bitwise operators, are discussed further in Appendix B.)
Section Contents
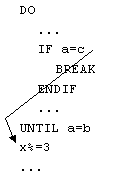
The BREAK command jumps out of a DO...UNTIL or WHILE...ENDWH structure. The line after the UNTIL or ENDWH statement is executed, and the lines following are then executed as normal. For example:
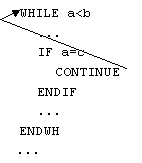
The CONTINUE command jumps from the middle of a loop to its test condition. The test condition is either the UNTIL line of a DO...UNTIL loop or the WHILE line of a WHILE...ENDWH loop. For example:
The GOTO command jumps to a specified label. The label can be anywhere in the same procedure (after any LOCAL or GLOBAL variable declarations). In this example, when the program reaches the GOTO statement, it jumps to the label exit::, and continues with the statement after it.
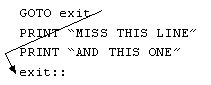
The two PRINT statements are missed out.
Labels themselves must end in a double colon. This is optional in the GOTO statement - both GOTO exit:: and GOTO exit are OK.
The jump to the label always happens - it is not conditional.
Don’t use GOTOs instead of DO...UNTIL or WHILE...ENDWH, as they make procedures difficult to understand.
VECTOR jumps to one of a list of labels, according to the value in an integer variable. The list is terminated by the ENDV statement. For example:
          VECTOR p%
                FUNCA,FUNCX
                FUNCR
          ENDV
          PRINT "p% was not 1/2/3" :GET :STOP
    FUNCA::
          PRINT "p% was 1" :GET :STOP
    FUNCX::
          PRINT "p% was 2" :GET :STOP
    FUNCR::
          PRINT "p% was 3" :GET :STOP
Here, if p% is 1, VECTOR jumps to the label FUNCA::. If it is 2, it jumps to FUNCX::, and if 3, FUNCR::. If p% is any other value, the program continues with the statement after the ENDV statement.
The list of labels may spread over several lines, as in this example, with a comma separating labels in any one line but no comma at the end of each line. Again, you can write each label in the list with a double colon, if you like.
VECTOR...ENDV can sometimes save you from having to write very long IF...ENDIF structures, with ELSEIF used many times.
This example introduces the STOP command. This stops a running program completely, just as if the end of the program had been reached. In a module with a single procedure, STOP has the same effect as using GOTO to jump to a label above the final ENDP.
Zero and non-zero are logical values meaning ‘False’ and ‘True’ respectively. UNTIL 0 and WHILE 1 therefore mean ‘do forever’, since the condition 0 is never ‘True’ and the condition 1 is always ‘True’. Use loops with these conditions when you need to check the real condition somewhere in the middle of the loop. When the real condition is met, you can BREAK out of the loop.
For example:
    PROC test:
          WHILE 1
                ...  REM some other lines here
                IF KEY :BREAK :ENDIF
                ...  REM some other lines here
          ENDWH
    ENDP
This example uses the KEY command. KEY returns 0 if no key has been pressed. When a key is pressed, KEY returns a non-zero value which counts as ‘True’, and the BREAK is executed.
    DO
          statements
    UNTIL condition
    WHILE condition
          statements
    ENDWH
    IF condition
          statements
    [ELSEIF condition
          statements]
    [ELSE
          statements]
    ENDIF
          VECTOR int%
                label1, label2
                label3...
          ENDV
          ...
    label1::
          ...
    label2::
          ...
    label3::
          ...
GOTO label jumps to label::
BREAK goes to the first line after the end of the loop - the line following the UNTIL or ENDWH line.
CONTINUE goes to the test condition of the loop - the UNTIL or the WHILE line.
STOP stops a running program completely.
|
|
|
|