|
| |
The 10 Most Common Errors ( Violin / Viola )
Introduction.
I do not make beginners and very young violinists
consciously aware that I am teaching them posture all the time ( even if I am
doing so ! ). It is an invisible element to the lesson, transparent, something
which does not intrude on the spontaneity of the bowing mechanism nor does it
spoil the process of music 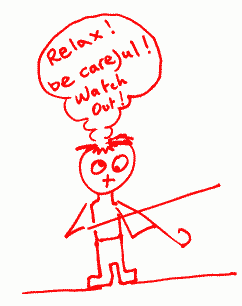 making. The very command "Relax your
shoulder!" is one that can cause more worries and tension and do more to
tense it than any other phrase. Therefore, until a child has gained flair,
freedom, and familiarity with the instrument, like a fish in water, I do not
impose nor make them aware of a set of rules to adhere to with regards posture.
Of course, I hope the student reaches this stage ( around Violin playtime 2 )
with as little defects as possible, and with the main emphasis on their playing
always having been made on the positive side, rather than using negative
comments. In case negative comments have to made from the start ( as in
"Violin Up!" ) I try to say it in a cheerful manner, as if it were a
fact and not a criticism. Sometimes I will joke about it, saying "Do not
shoot the ants with your scroll"...and if the child can laugh about it,
often the point is conveyed much more effectively. Therefore, I consider the art
of teaching knowing what not to say, rather than overloading a child with
don't do this ... don't do that !!!!!! Any person can go through the following
checklist and completely drown their child with negative comments which would
take away all their participation and enjoyment of playing. making. The very command "Relax your
shoulder!" is one that can cause more worries and tension and do more to
tense it than any other phrase. Therefore, until a child has gained flair,
freedom, and familiarity with the instrument, like a fish in water, I do not
impose nor make them aware of a set of rules to adhere to with regards posture.
Of course, I hope the student reaches this stage ( around Violin playtime 2 )
with as little defects as possible, and with the main emphasis on their playing
always having been made on the positive side, rather than using negative
comments. In case negative comments have to made from the start ( as in
"Violin Up!" ) I try to say it in a cheerful manner, as if it were a
fact and not a criticism. Sometimes I will joke about it, saying "Do not
shoot the ants with your scroll"...and if the child can laugh about it,
often the point is conveyed much more effectively. Therefore, I consider the art
of teaching knowing what not to say, rather than overloading a child with
don't do this ... don't do that !!!!!! Any person can go through the following
checklist and completely drown their child with negative comments which would
take away all their participation and enjoyment of playing.
However, at a certain stage, when a child has a huge
reserve of confidence, it may be time to make a clear and simple chart of
defects which need attention or putting right. I repeat that even in this case
it is better to deal with one problem at a time, and not to be too ambitious and
overloading.
The very last word of warning is that same point made
over, yet again. The expert teacher will know how to balance the child's musical
training with a technical one. This delicate balance is needed all the time. I
make children actually start off their first lesson with genuine pieces of
music, and then it is during an exciting journey through different pieces that
technique is "injected", in small painless doses ( or with as little
pain as possible ). Later, when a child is stronger, technically and musically,
one can focus more heavily on the subject of posture. The following list is
"teachers" material, and like a strong medicine, if taken in the wrong
doses can cure or kill !
 | 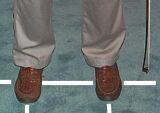 Feet not aligned or not lined up. The feet should be placed in a
normal manner, not twisted around each other. One must play standing with
equal weight on both feet. Each foot to be placed under each shoulder. The
feet should be parallel, as if standing on a railway track. When lining up
along a line, the tips of the toes should touch the line. There are
different stances, but this one is known as the practice stance. Feet not aligned or not lined up. The feet should be placed in a
normal manner, not twisted around each other. One must play standing with
equal weight on both feet. Each foot to be placed under each shoulder. The
feet should be parallel, as if standing on a railway track. When lining up
along a line, the tips of the toes should touch the line. There are
different stances, but this one is known as the practice stance.
|
| 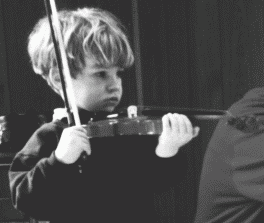 Violin pointing down towards the ground, and / or gap between violin
button and neck, making it look as if the violin is slipping down
towards the ground. Also
known as "shooting ants" and "sinking Titanic". This disease
is quite common, and causes tiredness due to an imbalanced posture with too much
weight thrown forwards. The bow starts to drift into the fingerboard area and a
noticeable drop in body tone results from not having a stable, horizontal
platform for the bow to lean on. Bowing becomes slow and cumbersome because of
the extra burden of the shoulders and head which should be held slightly back to
counterbalance the weight of the violin and our arms. In this picture a 3 year
old holds his violin in a healthy horizontal position. You will find buttoned collars most
uncomfortable when trying to hold the violin as closely as possible. You
must wear comfortable clothes which do not impede a naturally close contact
with the violin. As to keeping the violin horizontal, a bad posture is to
lean forwards slightly in the same direction as the violin thereby adding
more weight to that side of the body. In order to counterbalance the weight
of ones arms and the violin, one should lean slightly backwards and look
slightly upwards, thereby lifting the position of the violin to horizontal,
and also assuming a healthy upright position especially especially good for the
chest. Violin pointing down towards the ground, and / or gap between violin
button and neck, making it look as if the violin is slipping down
towards the ground. Also
known as "shooting ants" and "sinking Titanic". This disease
is quite common, and causes tiredness due to an imbalanced posture with too much
weight thrown forwards. The bow starts to drift into the fingerboard area and a
noticeable drop in body tone results from not having a stable, horizontal
platform for the bow to lean on. Bowing becomes slow and cumbersome because of
the extra burden of the shoulders and head which should be held slightly back to
counterbalance the weight of the violin and our arms. In this picture a 3 year
old holds his violin in a healthy horizontal position. You will find buttoned collars most
uncomfortable when trying to hold the violin as closely as possible. You
must wear comfortable clothes which do not impede a naturally close contact
with the violin. As to keeping the violin horizontal, a bad posture is to
lean forwards slightly in the same direction as the violin thereby adding
more weight to that side of the body. In order to counterbalance the weight
of ones arms and the violin, one should lean slightly backwards and look
slightly upwards, thereby lifting the position of the violin to horizontal,
and also assuming a healthy upright position especially especially good for the
chest.
|
| Not using the whole bow, and a general lack of bowing freedom
thereby not reaching neither the heel nor the tip of the bow. One must have
the ability to use the whole bow even if a piece does not require it.
Scales, slurred or separate, must be  played with 100% of the length of the
bow. It is harder to reach the heel than the tip of the bow, because the
lower half of the bow is harder to master. It involves accompanying the
right hand with the elbow, moving the upper arm freely. If shoulders are
tense, then the upper arm does not swing freely in the shoulder socket, and
the lower half of the bow becomes awkward. The first signs of a pupil not
using bow right up to the heel is a greasy bow without much rosin at the
heel. Make sure you rosin your bow and use it right up to the heel. played with 100% of the length of the
bow. It is harder to reach the heel than the tip of the bow, because the
lower half of the bow is harder to master. It involves accompanying the
right hand with the elbow, moving the upper arm freely. If shoulders are
tense, then the upper arm does not swing freely in the shoulder socket, and
the lower half of the bow becomes awkward. The first signs of a pupil not
using bow right up to the heel is a greasy bow without much rosin at the
heel. Make sure you rosin your bow and use it right up to the heel.
|
| Right hand little finger not bent causing harsh cords, abrupt bow
changes at the heel or not reaching 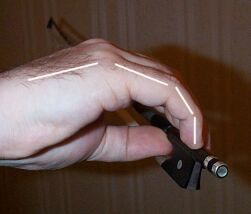 the heel at all. In addition, this
defect will cause the right hand to "lock up" losing its
flexibility. If the little finger is straight, one can liken it to a
toothpick ; brittle, week and inflexible. This is most important when trying
to adhere to the string with softness and suppleness in the lower half of
the bow. In fact the little finger should always be bent for maximum control
of the bow. For instance, placing the bow on the strings at the very tip is
harder with a straight little finger than with a bent one. the heel at all. In addition, this
defect will cause the right hand to "lock up" losing its
flexibility. If the little finger is straight, one can liken it to a
toothpick ; brittle, week and inflexible. This is most important when trying
to adhere to the string with softness and suppleness in the lower half of
the bow. In fact the little finger should always be bent for maximum control
of the bow. For instance, placing the bow on the strings at the very tip is
harder with a straight little finger than with a bent one.
|
| Right thumb not bent, or bent in the wrong direction. The thumb
plays a major role in adhering to the string. A straight or
"wooden" thumb won't 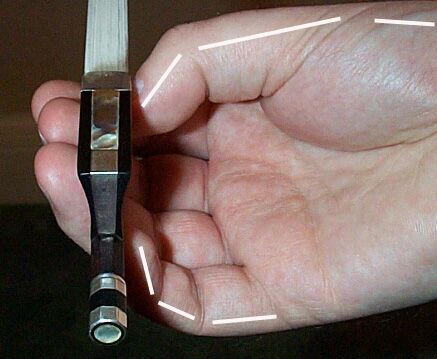 accompany the bow as it travels across the
string. The thumb must touch the bow in between the leather guard and the
frog. It should actually come into contact with the wood of the bow. A very
useful preliminary procedure is to try out the bow hold on a pencil. A
pencil is much lighter and easier to hold than a bow, so the general shape
of the hand is easier to understand. The thumb should bend just like
my thumb in this photo. Turning the bow upside down is an excellent way to
check up on the thumb and see if it is bent in the right direction. The
article on détaché has more information about
the thumb. accompany the bow as it travels across the
string. The thumb must touch the bow in between the leather guard and the
frog. It should actually come into contact with the wood of the bow. A very
useful preliminary procedure is to try out the bow hold on a pencil. A
pencil is much lighter and easier to hold than a bow, so the general shape
of the hand is easier to understand. The thumb should bend just like
my thumb in this photo. Turning the bow upside down is an excellent way to
check up on the thumb and see if it is bent in the right direction. The
article on détaché has more information about
the thumb. |
| 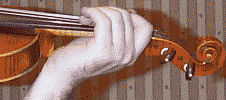 Left wrist touching
neck. Compare these two pictures. The palm of the left hand should never
touch the underside of the neck. Some beginners use this method to prop up
the violin, but it greatly inhibits a correct vertical finger Left wrist touching
neck. Compare these two pictures. The palm of the left hand should never
touch the underside of the neck. Some beginners use this method to prop up
the violin, but it greatly inhibits a correct vertical finger 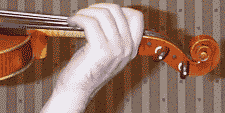 mechanism.
The hand and forearm should form a near perfect straight line. A slight
inward bend of the hand ( the palm bending slightly in the direction of the
player's nose can be a good thing ). A pointy wrist bending away from the
player is a very strained position of the left hand, and should not be
used. The left picture is good and the right picture is incorrect. mechanism.
The hand and forearm should form a near perfect straight line. A slight
inward bend of the hand ( the palm bending slightly in the direction of the
player's nose can be a good thing ). A pointy wrist bending away from the
player is a very strained position of the left hand, and should not be
used. The left picture is good and the right picture is incorrect.
|
| 1st finger not in tune ( or not on dot ). The first finger is often
played out of tune especially once the student has progressed on to the 4th
finger, and somehow has become careless about the tone between an open
string and a first finger. There are those who place it sharp and those who
place it flat. An incorrect first finger can compromise the correct
intonation of every subsequent finger used because it really affects the
placing of the whole hand. A first finger should also act as an anchor,
firmly keeping its place when 4th fingers and stretches are used.
|
| Upside down bowing. ( No this isn't playing with your bow upside
down ! ) rather, it's when you bow an up bow instead of a down bow, or a
down bow instead of an up bow. Firstly one must be clear about a down bow ;
it travels from left to right, in the same direction we read a book. An up
bow goes from right to left, and usually goes up if we are bowing on the A
or E strings. On the D and G strings the bow will seem quite horizontal.
Keeping the same bowing ( and fingering ) in a piece is the only secure way
of avoiding muddles and uncertainties. It is the only way to learn a piece
by heart, and eventually, if your teacher has chosen excellent bowings and
fingerings, correct bowing will show you the way to play with a great style.
I never allow a student to "get used" to an incorrect bow
direction.
|
| Jerky bow changes. The bow change should always be smooth and slow.
One must not change bow direction with a sudden impulse, as the string
vibration will become upset and the bow will loose adherence, and a
disturbing noise will be heard
|
| Not placing and drawing the bow. The bow must not "crash
land" on the string from above as a note is started. It must rest
firmly on the string, even with a little weight before it is neatly draw, in
firm contact with the string. The habit of starting from mid air can cause
the bow to bounce upon impact, and will also probably produce a scratchy and
harsh start to a note, which may be difficult to recover from. Always
"Place then draw". Never draw the bow unless it is perfectly
stationary, sitting on the string. I notice the defect of "crash
landing" never occurs with students who start with me ( unless they
have suffered external contamination ). I do, however, find it common with
students who have not started with me, and wish to start their piece with an
impressive bang - which is really nothing more than a percussive, and noisy
habit. It does not impress. A note should be "attacked" from the
string.
|
| More will be added ( the 20 most common errors.....the 30 most common
errors......etc. )
|
|