My telescope is a fast 10" Newtonian Reflector on an
German equatorial mount
The Optical Tube Assembly is made in the U.K. ~ Updated 13th Sept. 2000
 Orion Optics
(UK) : GX 250 F4.8 on Vixen Great Polaris ( GP Mount )
Orion Optics
(UK) : GX 250 F4.8 on Vixen Great Polaris ( GP Mount )
Disclaimer : This is a page about my telescope. It is not so much a review, as an account
of my experience in getting it up and running. A word of warning though : It is
not totally authoritative, but I hope it helps others who may
have found themselves a little lost ( as I did ) after receiving their first
scope. Please forgive any mistakes, and email me if I have got things horribly
wrong ! I am lucky to have found someone with experience to help me with such
difficult things as dotting the primary, aligning the secondary and collimation.
Lastly, I regret that am not qualified to review this instrument, but I do know Orion Optics
( the UK firm ) have a very good reputation for producing above entry level scopes.

 Newtonian history : It was Isaac Newton who invented the reflecting
telescope in 1668. The Newtonian is still the basic design for a reflecting
telescope and has long been a favourite with amateur astronomers. I shall call
my scope "Halley", recalling Edmund Halley, who encouraged
Newton to publish his "Principia". Halley's comet has come and gone
for the moment, so there should be no confusion that the bright white object
called Halley sitting in my lounge is a telescope, not a comet. Left :
The
telescope pictured here is Newton's first 1 inch reflecting telescope.
Newtonian history : It was Isaac Newton who invented the reflecting
telescope in 1668. The Newtonian is still the basic design for a reflecting
telescope and has long been a favourite with amateur astronomers. I shall call
my scope "Halley", recalling Edmund Halley, who encouraged
Newton to publish his "Principia". Halley's comet has come and gone
for the moment, so there should be no confusion that the bright white object
called Halley sitting in my lounge is a telescope, not a comet. Left :
The
telescope pictured here is Newton's first 1 inch reflecting telescope.
Choosing the Equipment : I made the trip to Orion Optics, in Crewe,
Cheshire, and met someone called Barry who quickly persuaded me to go for the
GX250 rather than the GX200. He said "I'd be so impressed with the 8
inch scope that I'd be saying ..why on Earth didn't I get the 10 inch ?".
Well yes, I had heard of aperture fever, and I knew the GX250 was no longer than
the GX200 but I was a bit worried about getting a scope with such short focal
length. Anyway, all of a sudden I heard myself order the 10 inch scope with 3 Vixen Lanthanum 25mm 10mm and 4mm
eyepieces. I was told that I didn't need the DX mount ; the GP ( Great
Polaris ) was sufficient ( though notice the GP is rated for 7 kg max. &
this scope weighs 8 kg. ). I
also ordered a moon filter, a Sodium light pollution filter and 2 flexi-drive
handles ( 32cm ). Lastly, I upgraded the finder to the more comfortable right
angled 10x50 instead of the 6x30. Next week, right on schedule, the scope
arrived in 2 large boxes.
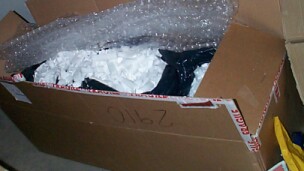
 Unpacking. Well this was straight forward. Even I could do it.
I just made sure I didn't leave anything in the box before throwing it out. Out
came the 3 feet, 1 stand, GP mount, 2 counter weights, weight-shaft,
weight-shaft lock ring, finder-scope, box of eyepieces, instructions ( on the
left ) ,
flexi-drive handles and filters. The other box had the Optical Tube Assembly (
the scope ! ) wrapped in plastic and buried deeply in polystyrene flakes. I
found the instructions helpful only for the mount, because they usually refer
to Japanese Vixen Telescopes. There was nothing to help with assembly, because
the telescopes in the instructions all have tripods. It is of course possible to
attach the GP mount to a field tripod rather than a stand.
Unpacking. Well this was straight forward. Even I could do it.
I just made sure I didn't leave anything in the box before throwing it out. Out
came the 3 feet, 1 stand, GP mount, 2 counter weights, weight-shaft,
weight-shaft lock ring, finder-scope, box of eyepieces, instructions ( on the
left ) ,
flexi-drive handles and filters. The other box had the Optical Tube Assembly (
the scope ! ) wrapped in plastic and buried deeply in polystyrene flakes. I
found the instructions helpful only for the mount, because they usually refer
to Japanese Vixen Telescopes. There was nothing to help with assembly, because
the telescopes in the instructions all have tripods. It is of course possible to
attach the GP mount to a field tripod rather than a stand.
 Assembly.
Left : Attach the 3 feet to the mono-stand. Using the bubble ( you can see
the bubble right
in the middle of the picture on the right ) , I can actually vary the height of
any of the feet to get the mount level. This should help track stars more
accurately, after polar alignment. After screwing in the 3 feet, I
found a medium size Philips screwdriver and attached the mount to the top of the
stand.
Assembly.
Left : Attach the 3 feet to the mono-stand. Using the bubble ( you can see
the bubble right
in the middle of the picture on the right ) , I can actually vary the height of
any of the feet to get the mount level. This should help track stars more
accurately, after polar alignment. After screwing in the 3 feet, I
found a medium size Philips screwdriver and attached the mount to the top of the
stand.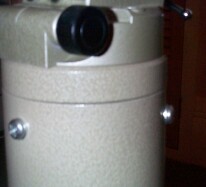 You can see 2 of these 3 screws on the right. So far no problems ! The next
stage, involving lifting the scope up and securing it on to the mount I
found quite tricky ( for the first time ). In fact, I got my girlfriend to help
me support the main tube around the mirror area ( the heavier side ), just in
case it slipped. By now, I have practised quite a lot in daytime on my own, and
have found a knack for putting on the scope which I will describe shortly. It's
a good idea to become familiar with setting up the telescope in daytime before
you go out into the dark.
You can see 2 of these 3 screws on the right. So far no problems ! The next
stage, involving lifting the scope up and securing it on to the mount I
found quite tricky ( for the first time ). In fact, I got my girlfriend to help
me support the main tube around the mirror area ( the heavier side ), just in
case it slipped. By now, I have practised quite a lot in daytime on my own, and
have found a knack for putting on the scope which I will describe shortly. It's
a good idea to become familiar with setting up the telescope in daytime before
you go out into the dark.
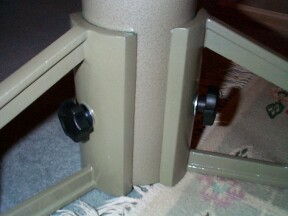
 Balance
the scope. Left : The Counter weight shaft, and lock ring ( the lock ring can just
be seen on the top right ) are screwed in next. The counter weights are needed
to balance the weight on the optical tube, so that it doesn't come crashing down
when you unfasten the Right Ascension clamp. I put the fat weight on first. I
think the counter weights should go on before the tube, for safety reasons. This
way the tube will be roughly balanced as soon as you secure it to the mount. I
must then loosen the R.A. clamp, and balance the scope by seeing which way it
rolls. Weight is added by moving the counter weights away from the base or
stand, until the tube rolls smoothly around this axis. The declination axis
should already be balanced because the 2 rings around the tube should already be
positioned around the centre of gravity of the tube. The finder-scope must be
attached to the main tube because even this will affect the balance. On the
right you can see the useful counter shaft safety screw. This will ensure a
counterweight doesn't come crashing down on your foot if you haven't screwed the
counter weight on tightly enough.
Balance
the scope. Left : The Counter weight shaft, and lock ring ( the lock ring can just
be seen on the top right ) are screwed in next. The counter weights are needed
to balance the weight on the optical tube, so that it doesn't come crashing down
when you unfasten the Right Ascension clamp. I put the fat weight on first. I
think the counter weights should go on before the tube, for safety reasons. This
way the tube will be roughly balanced as soon as you secure it to the mount. I
must then loosen the R.A. clamp, and balance the scope by seeing which way it
rolls. Weight is added by moving the counter weights away from the base or
stand, until the tube rolls smoothly around this axis. The declination axis
should already be balanced because the 2 rings around the tube should already be
positioned around the centre of gravity of the tube. The finder-scope must be
attached to the main tube because even this will affect the balance. On the
right you can see the useful counter shaft safety screw. This will ensure a
counterweight doesn't come crashing down on your foot if you haven't screwed the
counter weight on tightly enough.
 Mounting
the tube : I noticed that the tube is balanced near the 2 rings or brackets
attached to its circumference. ( This is not at the centre of the tube, because the
primary mirror, fixed at the end, makes up for most of the weight of the optical
tube. ) Right and Left : This is where I pick the tube up and handle it, with another hand on the
primary mirror. The tube is not as heavy as it looks ( 8 kg. or 18 lbs. ), again, most of the weight
being in the primary mirror ( which I gather is slightly thinner than usual ).
Mounting
the tube : I noticed that the tube is balanced near the 2 rings or brackets
attached to its circumference. ( This is not at the centre of the tube, because the
primary mirror, fixed at the end, makes up for most of the weight of the optical
tube. ) Right and Left : This is where I pick the tube up and handle it, with another hand on the
primary mirror. The tube is not as heavy as it looks ( 8 kg. or 18 lbs. ), again, most of the weight
being in the primary mirror ( which I gather is slightly thinner than usual ).
On the left you can see the yellow tube plate lock screw, and the safety screw just
above it. Unwind these, ready to accept the tube, and rotate the mount head so
that the same big yellow
screw is above the rest of the mount. 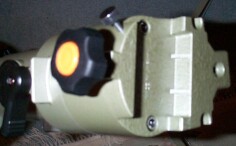 When you slot
the tube plate into it, make
sure you engage the lower edge of the plate fully into the recess of the mount
head, then pivot the tube towards you, as the other side enters the screw side
of the mount head. Make sure it lies firmly and flush within the mount head,
then tighten the yellow screw, and the safety screw next to it. Be careful not
to accidentally turn this yellow screw at night when viewing the stars !
When you slot
the tube plate into it, make
sure you engage the lower edge of the plate fully into the recess of the mount
head, then pivot the tube towards you, as the other side enters the screw side
of the mount head. Make sure it lies firmly and flush within the mount head,
then tighten the yellow screw, and the safety screw next to it. Be careful not
to accidentally turn this yellow screw at night when viewing the stars ! 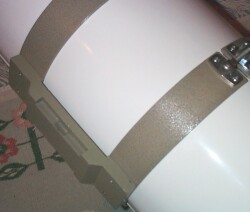
Another picture left shows the 2 rings which secure
the tube plate to the tube at a balanced point between the two ends of the tube.
On the right I am maneuvering the main tube towards the mount. I often trip up
on one of the three legs, so be careful, these tend to get in the way.

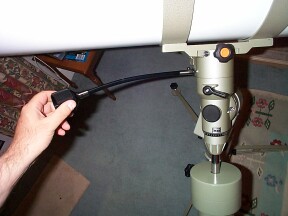
 The
Flexi drive handles. On
the left, Halley is pointing out of the window, for some daytime testing on
next door neighbor's guttering, some 200 meters away. You can read the writing
on the guttering ! Before going outside in the dark I found it useful to attach
the flexi drive handles on. On the right, you can see the R.A. slow motion
control. I found I had to unscrew the square plastic motor housing
compartment so I could screw on the flexi handle. There is only one little screw
holding the plastic housing in place, so you will need a small Philips screwdriver. When you lock
the Right Ascension ( or R.A. ) axis, turning the flexi handle slowly will
rotate the scope very accurately and smoothly so you can "follow the
stars". In reality you are compensating for the Earth's rotation. The only
thing about 320mm flexi drives are that on this scope they are a little too
short ( unless you have unusually long arms ). I'm trying to see if I can get
longer ones.
The
Flexi drive handles. On
the left, Halley is pointing out of the window, for some daytime testing on
next door neighbor's guttering, some 200 meters away. You can read the writing
on the guttering ! Before going outside in the dark I found it useful to attach
the flexi drive handles on. On the right, you can see the R.A. slow motion
control. I found I had to unscrew the square plastic motor housing
compartment so I could screw on the flexi handle. There is only one little screw
holding the plastic housing in place, so you will need a small Philips screwdriver. When you lock
the Right Ascension ( or R.A. ) axis, turning the flexi handle slowly will
rotate the scope very accurately and smoothly so you can "follow the
stars". In reality you are compensating for the Earth's rotation. The only
thing about 320mm flexi drives are that on this scope they are a little too
short ( unless you have unusually long arms ). I'm trying to see if I can get
longer ones.
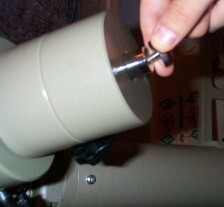
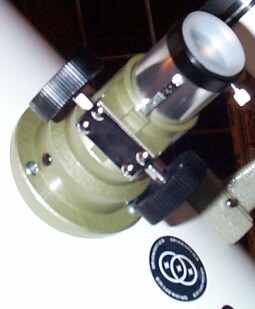
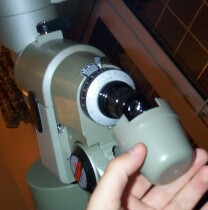
 The
Finder-scope. Left : the declination axis flexi drive handle is easier
to install than the R.A> one, you just need a flat screwdriver. On the right you can see the finder-scope attachment screw.
On of the first things I adjusted was the finder-scope alignment. On the
circumference of the tube you can see 2 of the 3 screws that are used to align
the finder. Probably the easiest way to do this is to locate a bright star, such
as Vega, almost directly ahead in the UK in Summer, with a 25mm or 30mm
eyepiece. Once you have found it, lock the axis of the scope, and try to adjust
the 3 screws I just mentioned until you centre Vega in the finder. This finder
hasn't got cross-hairs, or a target to help you centre a star, so I just have to
be content with having the object I am looking for as near the centre of view as
I can judge. This 10x50 finder hasn't got a long eye relief though, and it isn't
easy to place an object right in the centre. Practice helps. If you take your
finder-scope off and put it back on again, you will probably have to line it up
again.
The
Finder-scope. Left : the declination axis flexi drive handle is easier
to install than the R.A> one, you just need a flat screwdriver. On the right you can see the finder-scope attachment screw.
On of the first things I adjusted was the finder-scope alignment. On the
circumference of the tube you can see 2 of the 3 screws that are used to align
the finder. Probably the easiest way to do this is to locate a bright star, such
as Vega, almost directly ahead in the UK in Summer, with a 25mm or 30mm
eyepiece. Once you have found it, lock the axis of the scope, and try to adjust
the 3 screws I just mentioned until you centre Vega in the finder. This finder
hasn't got cross-hairs, or a target to help you centre a star, so I just have to
be content with having the object I am looking for as near the centre of view as
I can judge. This 10x50 finder hasn't got a long eye relief though, and it isn't
easy to place an object right in the centre. Practice helps. If you take your
finder-scope off and put it back on again, you will probably have to line it up
again.
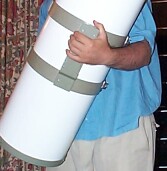
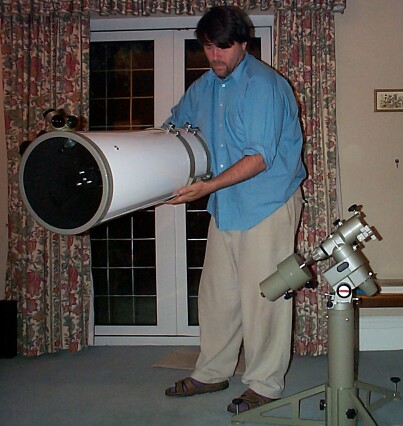
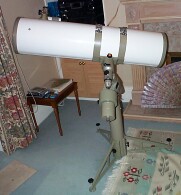
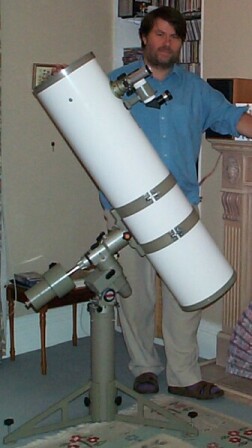 Left
: Halley in scale ! I thought I'd put this picture in, because all the
pictures of it on the net, and the brochure don't give you an idea of its size.
Well, it is quite a big beast, and I would say it is impossible to pick up and
carry outside on my own. That's until you unfasten the Optical tube and make two
or three separate trips. If you take the counter weights off, then putting the scope in
the car is no trouble at all with a bit of practice. You'll have to make separate trips, but this is well worth the trouble when you think you're moving
around a 10" scope. I'd like to give some specifications of my own here.
With the bathroom digital weighing scales ( 100 gr. accuracy ) I measured the
Optical tube assembly (OTA) plus finder at 10.4 kg. The counter weights were 7.3
kg and 4.5 kg, and the mount and stand were 10.0 kg for a total of 32.2 kg. So
carrying up to 10kg at a time is all you have to manage. The GX250 still weighs
10kg less than the Russian Tal-2M, which is only a 6 inch scope. The main tube lies on the back seat of my car, and the
stand fits upright in the boot of my Citroen Z.X. station wagon.
Left
: Halley in scale ! I thought I'd put this picture in, because all the
pictures of it on the net, and the brochure don't give you an idea of its size.
Well, it is quite a big beast, and I would say it is impossible to pick up and
carry outside on my own. That's until you unfasten the Optical tube and make two
or three separate trips. If you take the counter weights off, then putting the scope in
the car is no trouble at all with a bit of practice. You'll have to make separate trips, but this is well worth the trouble when you think you're moving
around a 10" scope. I'd like to give some specifications of my own here.
With the bathroom digital weighing scales ( 100 gr. accuracy ) I measured the
Optical tube assembly (OTA) plus finder at 10.4 kg. The counter weights were 7.3
kg and 4.5 kg, and the mount and stand were 10.0 kg for a total of 32.2 kg. So
carrying up to 10kg at a time is all you have to manage. The GX250 still weighs
10kg less than the Russian Tal-2M, which is only a 6 inch scope. The main tube lies on the back seat of my car, and the
stand fits upright in the boot of my Citroen Z.X. station wagon.
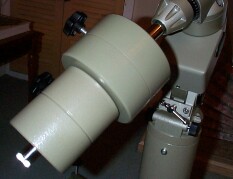
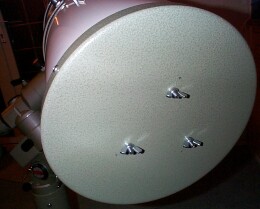
 On
the right you can see the nice quality focuser. There's a metal plate
underneath which you can see. I found tightening the two screws on the right
very slightly gave me a better feel to the focusing mechanism. I suppose this is
down to individual taste. I don't like the focuser too loose, otherwise it may
go out of focus when you don't want it to. You can see a plastic cap on the end,
and I think it's a good idea to cap all the open ends to avoid getting dust
inside the tube. A little bit of dust doesn't really hurt the optics, and I
think it's far better to leave dust on mirrors and lenses than to try and clean
it off every 5 minutes. Cleaning any optical surface without damaging it is a
delicate operation that requires great care and knowledge.
On
the right you can see the nice quality focuser. There's a metal plate
underneath which you can see. I found tightening the two screws on the right
very slightly gave me a better feel to the focusing mechanism. I suppose this is
down to individual taste. I don't like the focuser too loose, otherwise it may
go out of focus when you don't want it to. You can see a plastic cap on the end,
and I think it's a good idea to cap all the open ends to avoid getting dust
inside the tube. A little bit of dust doesn't really hurt the optics, and I
think it's far better to leave dust on mirrors and lenses than to try and clean
it off every 5 minutes. Cleaning any optical surface without damaging it is a
delicate operation that requires great care and knowledge.
 Collimation
: On
the left : The 3 primary mirror collimation screws. Now just when everything
seemed complete and ready to go, I pointed the
scope randomly at some stars only to find that the 10 mm eyepiece was producing
fuzzy star images, and the 4 mm eyepiece was producing very large hazy disks to
stars, and there was no way I could focus that to bring the images to a
pinpoint. Also the fuzzy comas I was observing were square shaped. I looked through my focuser to see what looked
like ( to me ! ) an oversized secondary ( or "flat" ) too far up the
scope away from the primary. Well, that was my first impression. There
was one important issue I had been dreading all along, but was going to have to face :
collimation. Collimation is the alignment of the optics, so important for
getting the best results out of a telescope. Suddenly, I knew how critical
accurate collimation was to get the 4mm eyepiece to work well with my F4.8 primary mirror.
This primary is called "fast" because the focal length is so short (
1200mm ) for a mirror of this size. At this
stage I put up some posts on the UK amateur astronomy newsgroup asking for help,
and filled out the Bristol Astronomy Society's membership form. A few days
later, I was attending a lecture about the x-ray satellite "Chandra",
and talking collimation jargon in the pub with some new telescope friends I had
just made. In the meantime, various emails had arrived, and one was from
somebody called Steve not half an hour away offering help !
Collimation
: On
the left : The 3 primary mirror collimation screws. Now just when everything
seemed complete and ready to go, I pointed the
scope randomly at some stars only to find that the 10 mm eyepiece was producing
fuzzy star images, and the 4 mm eyepiece was producing very large hazy disks to
stars, and there was no way I could focus that to bring the images to a
pinpoint. Also the fuzzy comas I was observing were square shaped. I looked through my focuser to see what looked
like ( to me ! ) an oversized secondary ( or "flat" ) too far up the
scope away from the primary. Well, that was my first impression. There
was one important issue I had been dreading all along, but was going to have to face :
collimation. Collimation is the alignment of the optics, so important for
getting the best results out of a telescope. Suddenly, I knew how critical
accurate collimation was to get the 4mm eyepiece to work well with my F4.8 primary mirror.
This primary is called "fast" because the focal length is so short (
1200mm ) for a mirror of this size. At this
stage I put up some posts on the UK amateur astronomy newsgroup asking for help,
and filled out the Bristol Astronomy Society's membership form. A few days
later, I was attending a lecture about the x-ray satellite "Chandra",
and talking collimation jargon in the pub with some new telescope friends I had
just made. In the meantime, various emails had arrived, and one was from
somebody called Steve not half an hour away offering help !
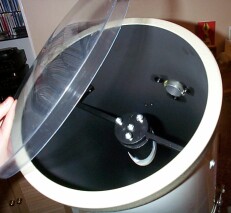
 Soon
enough I had my telescope all set up in Steve's sitting room. On the left :
You can see the collimation screws for the secondary mirror ( also called a
flat, because it is flat. ). There is a screw in the middle
of the flat,
and this proved vital because it allowed us to "push" the secondary
towards the primary until it was centered properly. We did have to loosen the 3
collimation screws first. Steve confirmed my suspicion
that the secondary was too far up the tube ( away from the primary ). You can see the focuser tube where
it meets the main tube in the left picture. On the right you can see both
primary and secondary mirrors. You can also see the reflection of the secondary
in the primary. One minor thing about the primary is that there is no
ventilation for it. The thick mounting plate might not help either.... it has
been suggested that drilling holes might help the cooling.....anyway I think I
can simply wait longer for the tube to cool down once you get outside.... the
longer you wait, the better ! I can't resist using the scope even while it is
cooling down, usually to see heat waves on the moon ! ( like the distortions you
get above hot tarmac ).
Soon
enough I had my telescope all set up in Steve's sitting room. On the left :
You can see the collimation screws for the secondary mirror ( also called a
flat, because it is flat. ). There is a screw in the middle
of the flat,
and this proved vital because it allowed us to "push" the secondary
towards the primary until it was centered properly. We did have to loosen the 3
collimation screws first. Steve confirmed my suspicion
that the secondary was too far up the tube ( away from the primary ). You can see the focuser tube where
it meets the main tube in the left picture. On the right you can see both
primary and secondary mirrors. You can also see the reflection of the secondary
in the primary. One minor thing about the primary is that there is no
ventilation for it. The thick mounting plate might not help either.... it has
been suggested that drilling holes might help the cooling.....anyway I think I
can simply wait longer for the tube to cool down once you get outside.... the
longer you wait, the better ! I can't resist using the scope even while it is
cooling down, usually to see heat waves on the moon ! ( like the distortions you
get above hot tarmac ).
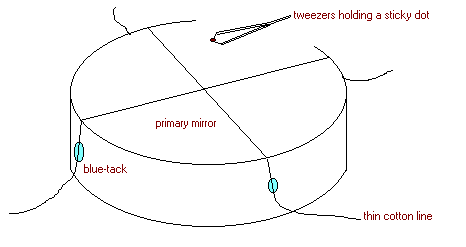 Dotting
the primary ( Left ) : The first thing Steve decided to do is "dot the
primary." I think he was half expecting a dot to be there....but it wasn't
of course. Well, we got a sticky dot, cotton gloves, cotton, tweezers, blue-tack
and a tape measure, and then unscrewed the primary off the scope, making sure we
pencil marked which screw came from where ( so we could put the mirror back on
without it having been rotated ). The mirror came off with 4 hands steadying it,
and we settled it on the carpet. Then we tried not to sneeze as we went about
finding the centre of the mirror. We blue tacked a cotton thread onto the side of the
mirror and tweaked the position of the cotton on the sides until we were sure
that the tape measure measured the same length of circumference each side of the
diameter. When we were sure we had two perfect diameters, Steve inserted a
sticky dot under the center with tweezers, and we pressed it gently down. The
sticky black dot was about half a centimeter in diameter. I preferred not
looking most of the time ! Anyway, it was quickly over, and we screwed the
mirror back in quickly not to leave any more dust settle on it than necessary.
I'm sure dust did get on it, but the advantages of having a fully collimated
scope far outweighed some extra dust on the primary. The dot itself doesn't
degrade the light gathering power of the primary, because it is directly in the
line of sight of the secondary, which itself blocks out some of the light that
would otherwise reach the primary.
Dotting
the primary ( Left ) : The first thing Steve decided to do is "dot the
primary." I think he was half expecting a dot to be there....but it wasn't
of course. Well, we got a sticky dot, cotton gloves, cotton, tweezers, blue-tack
and a tape measure, and then unscrewed the primary off the scope, making sure we
pencil marked which screw came from where ( so we could put the mirror back on
without it having been rotated ). The mirror came off with 4 hands steadying it,
and we settled it on the carpet. Then we tried not to sneeze as we went about
finding the centre of the mirror. We blue tacked a cotton thread onto the side of the
mirror and tweaked the position of the cotton on the sides until we were sure
that the tape measure measured the same length of circumference each side of the
diameter. When we were sure we had two perfect diameters, Steve inserted a
sticky dot under the center with tweezers, and we pressed it gently down. The
sticky black dot was about half a centimeter in diameter. I preferred not
looking most of the time ! Anyway, it was quickly over, and we screwed the
mirror back in quickly not to leave any more dust settle on it than necessary.
I'm sure dust did get on it, but the advantages of having a fully collimated
scope far outweighed some extra dust on the primary. The dot itself doesn't
degrade the light gathering power of the primary, because it is directly in the
line of sight of the secondary, which itself blocks out some of the light that
would otherwise reach the primary.
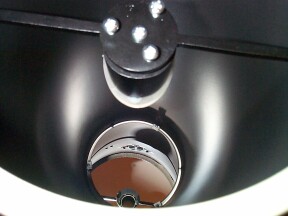
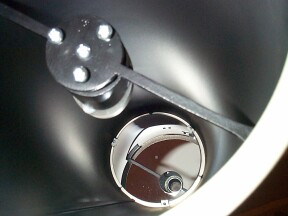 On
the right you can just about see the dotted primary mirror. So, with that
job done, collimation was going to be much easier. One starts with the
secondary. Steve loosened the 3 collimation screws on the secondary and screwed
the middle screw to shift the secondary into a more central position. He then
collimated the secondary ( don't ask me how ) and asked me to turn the primary
collimating screws until we had the primary roughly collimated. He told me that
once the secondary was fixed I probably wouldn't have to tweak it any further,
whereas the primary would need collimating probably every time I put the tube in
the car.
On
the right you can just about see the dotted primary mirror. So, with that
job done, collimation was going to be much easier. One starts with the
secondary. Steve loosened the 3 collimation screws on the secondary and screwed
the middle screw to shift the secondary into a more central position. He then
collimated the secondary ( don't ask me how ) and asked me to turn the primary
collimating screws until we had the primary roughly collimated. He told me that
once the secondary was fixed I probably wouldn't have to tweak it any further,
whereas the primary would need collimating probably every time I put the tube in
the car.
After an hour, we decided that the clouds were going to allow us
a quick peek at some stars. So with Lyra directly overhead, we split the double
double and zoomed in on the ring nebula with the 10mm. The next night I looked
at Jupiter's belts and Saturn's Cassini division at 2 in the morning with my 4mm
( 300x magnification ). The scope seemed to be performing much better, and I
could see the point in having a 4mm eyepiece now ! The next day I collimated my
primary, with my girlfriend rotating the screws as I looked through the focuser
until the dot was centered. Steve and I had roughly collimated directly
observing the stars, and the scope had been in the car since, so that would
explain why the dot was off centre. The 4mm was getting better and better, and the 10mm
was giving superb views !
 Two weeks on : I have seen several bands on Jupiter, and
the Cassini division on Saturn's rings was very crisp indeed, even with the 4mm
lens. I also saw a band on Saturn, and what seemed like several moons other than
Titan. I also tried splitting the double Alpha Andromeda ( previously Delta
Pegasus ) but cannot draw any conclusions from what I saw. Obviously the Planets
are easier targets to centre and pinpoint on the 4mm eyepiece. Using a 4mm 4
eyepiece is a question of stepping up the eyepiece from 25 to 10 to 4 mm at a
time. I now have a cross hair collimator by Orion ( the U.S. firm this time ! )
and have tried collimating myself. I am still not an expert, but I have made a
start on being self sufficient. I can confirm the outline of the secondary is
hard to centre because it is so big, and the 3 primary mirror clips only just
fit into the secondary. Moving the focuser in and out at several stages may help
to bring certain outlines into view. I would encourage people to experiment (
albeit carefully ) with collimation, because it makes a huge difference to the
results.
Two weeks on : I have seen several bands on Jupiter, and
the Cassini division on Saturn's rings was very crisp indeed, even with the 4mm
lens. I also saw a band on Saturn, and what seemed like several moons other than
Titan. I also tried splitting the double Alpha Andromeda ( previously Delta
Pegasus ) but cannot draw any conclusions from what I saw. Obviously the Planets
are easier targets to centre and pinpoint on the 4mm eyepiece. Using a 4mm 4
eyepiece is a question of stepping up the eyepiece from 25 to 10 to 4 mm at a
time. I now have a cross hair collimator by Orion ( the U.S. firm this time ! )
and have tried collimating myself. I am still not an expert, but I have made a
start on being self sufficient. I can confirm the outline of the secondary is
hard to centre because it is so big, and the 3 primary mirror clips only just
fit into the secondary. Moving the focuser in and out at several stages may help
to bring certain outlines into view. I would encourage people to experiment (
albeit carefully ) with collimation, because it makes a huge difference to the
results.
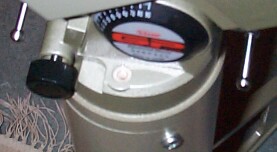
 Polar
scope. Left
: the Polar axis scope. This has a little red torch light to show up the
readings inside and looks really cool ! I'm sure I'll learn to polar align my
scope soon with practice, but for the moment I just point the polar axis roughly
towards Polaris. I did set the altitude graduation to 51° North, the latitude of Bristol, UK,
where I live. Polar alignment is explained on page 11 of the manual. The manual
( mostly for the GP mount ) can
be viewed from Vixen's site.
Polar
scope. Left
: the Polar axis scope. This has a little red torch light to show up the
readings inside and looks really cool ! I'm sure I'll learn to polar align my
scope soon with practice, but for the moment I just point the polar axis roughly
towards Polaris. I did set the altitude graduation to 51° North, the latitude of Bristol, UK,
where I live. Polar alignment is explained on page 11 of the manual. The manual
( mostly for the GP mount ) can
be viewed from Vixen's site.
Internet Links : Here is a link
to a page with many links to collimation articles. It contains better articles on the net about
collimation, ( for example Mel
Bartel's page ). Tectron Telescopes sell a popular
set of tools for collimating, and I'm hoping they'll send these along with their
handbook when they get back from their Star parties ! There's also a good book
on star testing called "Star
Testing Astronomical Telescopes" by Suiter, 9.00" by
6.00", 376 pages, published 1994, hardbound, 2 Lbs., 9 Ozs. ship wt.,
$24.95.
Conclusion : The telescope was harder to come to grips
with than I had realized, but I'm pleased I have got this far. I am not planning
any astrophotography. I would recommend the DX mount for this. Also, I think I
am not going to motorize or computerize the scope, although I know I could do
that at any stage in the future. Besides, I like finding my way around the stars
on my own. I would like to thank Orion
Optics for selling me a very nice piece of equipment, Steve South for his
expertise and all those who wrote emails and posts to helped
me get started with Halley ! . By the way ; where is Halley's comet right now ?