|
|
|
|
Some rough notes on posture LESSON : Right Hand : Holding the bow
Intro Much can be deduced by an
experienced eye from a players bow hold. Though there are many different ways to
hold a bow, there is always one suited to each particular hand. People with
short arms, and rounded hands almost always place them more comfortably than
people with long arms and fingers.
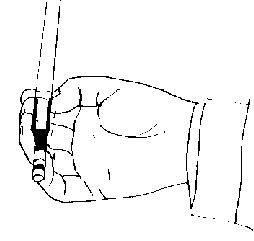
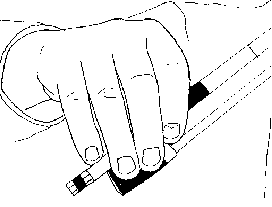
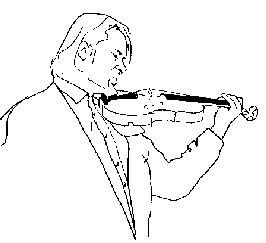
Above : A good bend in the thumb (
& fingers )
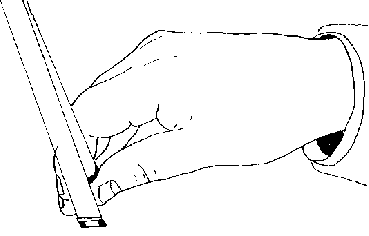
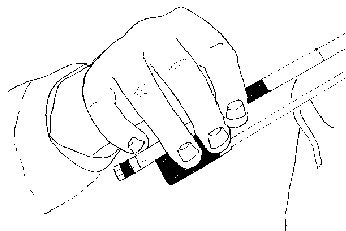
Above : A bad bow hold : The thumb
is bent the wrong way or not at all ! This easily creates undesirable
tension at the base of the thumb and can be the cause of a loss of adhesion to
the bow on the string. First steps
These are some key points of advice
for a violin beginner. They must be followed, and the teacher must know when and
how much to insist. 1. To understand the simplicity in
holding a bow try the following experiment: sit at a table and place a pencil in
front of you, parallel to your shoulders. Take your hand away. With as much
delicacy as possible, slowly lift the pencil about an inch off the table using
all 5 fingers. 2. The thumb. The first thumb joint (joining first to second phalanx) must always be bent. It must never be allowed to straighten out (or worse, bend backwards away from the hand), as this would cause a major loss in sound quality and is always considered unhealthy as it invariably leads to contractions and unnecessary tensing of the muscles at the base of the thumb. The second thumb joint should also be bent, and indeed the whole hand should feel and look quite rounded. This condition is the most natural, and one that occurs naturally if one sits down, completely relaxes his hand, and lays it, palm up, on a table in front of him.
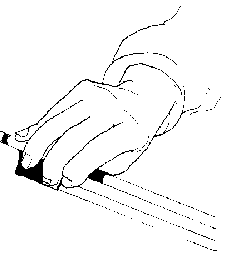
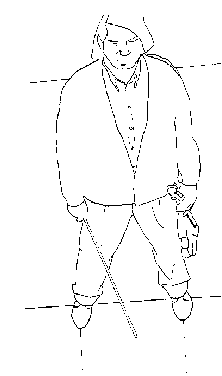
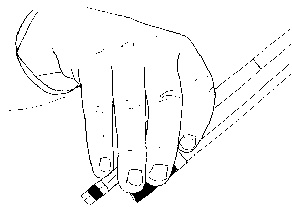
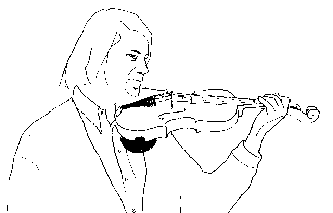
Above : Oh no ! The little finger
is not touching the bow on its tip ( this would be fine for a Cellist only.
Part 1 - BASICS cont. LESSON : L.H. Balancing the violin
Stance - Posture No fixed positions. Stand at ease
with even weight on both feet. Feet should be placed one under each shoulder.
The torso should not be twisted. Later we will add a tendency to lean on left,
especially to free the R.Arm for bowing.
Above : Good - The feet are shoulder width apart. This is a
good stance while studying. Holding the violin
Keep an upright head and turn it
slightly to the left. Use the right hand supporting the violin by its ribs to
lift it onto the collarbone as you gently lift your head to accommodate it. Now,
lower the head gently onto chin-rest. Do not lift the left shoulder, but support
violin with left hand. The scroll points to the ground to relax left hand
(position shifts use horizontal or high scroll to throw weight of violin towards
player.)
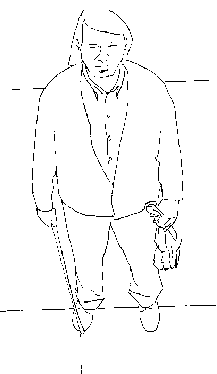
Above : A casual stance ; the feet
are untidy and imbalanced - This just will not do ! Left Arm
For the first steps in placing the fingers on the fingerboard: Do not pull elbow far to the right - it should fall naturally somewhat to the left! Like holding on to a tram or bus hand grip; the elbow dangles down, settling at ease due to its own weight. Placing the elbow excessively to the right puts an enormous strain on the whole arm, which, no longer relaxed, robs the hand of most of its freedom and suppleness. The violin changes position for E
to G string playing.
Above : Here there is no slant. This is very close to a good hold, but just 5 - 10 degrees of slant would already be acceptable
The Left hand
A U-shaped valley should form
between 1st finger & thumb. A "bath tub" - incredibly relaxed.
Violin neck should sink in quite deeply with utmost comfort. The wrist should
bend in towards player slightly. The fingers are placed on A string 1st position
with fleshy part on string - keeping fingers & whole hand rounded. The thumb
should remain totally passive, wherever it falls (although deeply into neck
& opposite 1st - 2nd finger. Finger placing exercise.
The following exercise is to be
done in a very slow and soft manner. With a lazily rounded hand, aim to touch
the fingerboard with as fleshy a part of the fingertip as possible, giving a
large area of contact. Place, without bowing, in 1st position on the A string A
B Csh D E* The fingers should move fairly slowly, and on reaching the string,
should slowly and consciously begin to depress the string, until it contacts the
fingerboard, after which it should slowly release the string from the
fingerboard, and continue to lift itself up, away from the string. The path of
movement should be directly into and away from the string, so as to make it move
through the shortest path to reach the fingerboard. Both thumb & wrist should
remain totally relaxed & passive. The thumb should approximate the curvature
of the neck. The fingers should use an incredibly light pressure on fingerboard,
especially after contacting it. Think of how little pressure is needed to stop a
string! * (or E flat if the 4th finger
feels too week to make the E natural completely relaxed. This is so as not to
tire or tense it, but just allow a free & smooth articulation. Later,
gradually go for E natural) LESSON : R.H. Open string bowing
Above : keep the bow parallel to
the bridge at all times. This is slightly harder to maintain at the heel and the
tip The following exercise can be practiced at all levels, from a beginner's first lesson to a concert violinist who has spent a few days away from his instrument. The first necessity in each case is to acquire or reacquire sound (quality), and for this purpose a whole bow stroke is used. The objective of this stroke is
that of sustaining a pure and even timbre. It is impossible to overemphasize
this fundamental guideline. The true quality of the violin tone needed can only
be understood from live examples. However these descriptions will help towards
the right approach. We shall refer to this idealistic timbre as
"tonus". Tonus must always consist of a true and adherent contact
between bow and violin. The tone must never be forced, just as one's own singing
voice can become crude or acquire a harsh edge if forced. The fullness of the
tone must be attained quite naturally, leaving the weight of the bow to fall
vertically on the string. The tone must always be beautiful; the more refined
and coherent the sound, the more perfected the bowing technique. The quality of
the sound, or sound itself is first created in the imagination, or the mind. All
the different sensations, the physical touch such as the tingling of the bow in
the fingers, the feeling of a floating elbow during the stroke, the surrounding
acoustics, and many others are recorded mentally, and this image is just as
important to the quality of the sound as the physical movements themselves. Above : The violin is held too high
Above: Violin too low ( only rarely is a slightly low postion desirable for relaxed left hand passage work which relies on lightness, agility & reflexes
Above: This more horizontal violin hold is better, though
sometimes the strings themselves should follow a horizontal line Physics of a bowed string
Before starting, here are some
fundamental rules worth going over. 1) The best tone and the easiest to
produce is accomplished by drawing the bow parallel to the bridge. This requires
particular care especially when nearing the two extremes of the bow. 2) The faster the bow speed, the
closer the bow contact should be to the fingerboard. Very slow bowing should be
done quite close to the bridge; in some cases, extremely close. 3) The shorter the bowed string is
stopped with the left hand, the closer the bow contact should be to the bridge.
So, as progressively higher notes as played, such as an ascending scale, so
should the bow contact move proportionately towards the bridge and vice versa. 4) The lighter the bow pressure,
the further away from the bridge the bow contact should move and vice versa. 5) The volume of sound can be
increased by drawing the bow faster across the string, producing a larger
amplitude in string vibration or displacement. More bow equals more sound.
(Beware of thinking that bow pressure alone can be used, as this often leads to
crushing the sound. Bow pressure or weight should never be excessive, and only
enough to keep the bow in contact with the string is necessary. The cantabile
sound of a G string, for example, is easily suffocated by excessive bow pressure
which kills the string oscillations. By lightening the bow, very often the
bowing movement and the sound is freed, releasing 200 % more sound.)
Aside from varying the volume of
the sound, there are many different colours or shadings of sound (timbres) that
can and should be produced, just as there are different sounds in the vowels; (h)a(y)
(b)ee (p)ie (n)o (y)ou o(r) and (c)a(t).. The important point to note is that
whatever sound was created at the start of the bow be maintained throughout the
bow; imagine the sound of a fog horn, or a ship entering port. Another part of
the sound is its 'bite', its presence, the hardness or softness, or its density.
This is not to be confused with its volume, as two sounds of the same volume can
seem to have different amounts of tension; one tense, hard, more solid, the
other more relaxed, softer, airy, but just as loud. The first sound would be
produced with a slower bow speed, nearer the bridge, allowing much of the bow
weight, and indeed some of the weight of the whole arm to bite into the string,
creating a very definite friction to produce a very direct sound. The second
sound relies on a faster bow speed, producing a more ample string vibration,
which must not be suffocated or impaired by using much less bow weight with a
point of contact nearer the fingerboard. The sound is thus free to travel and
expand. Between these extreme sounds there are many graduations, indeed, how
many depends on the players imagination. Open string exercise
Choose a middle string. Beginners should start with the D string. Place the bow on the string at the tip, and with whatever you feel to be a medium velocity, draw the bow evenly to the heel. Be sure not to miss out the first or last centimeter of bow. The bow should be lifted at the end of the stroke, so that the sound is left to die down gradually, and not abruptly, as would happen if the bow is stopped on the string i.e. as if you were playing in a large hall with a long reverberation. The next exercise is to make a down bow; the hand should simply guide the bow at an even speed along a straight line parallel to the bridge. The point of contact of the bow should lie about half way between the bridge and fingerboard, and more importantly, wherever this point of contact, it should remain fixed and not wander between the bridge and fingerboard throughout the bow stroke. This point of contact tends to drop towards the fingerboard and over it especially if the scroll of the violin is held low. For this exercise the length of the string should lie horizontally, that way no effort will be used in keeping a fixed point of contact.
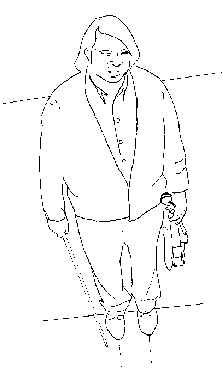
Above : Oh no ! Too large a gap
between violin & player. There should be no space ( not even a finger's
width )
Next chapters : Part 1 - BASICS cont. LESSON : L.H. Finger work ------------------------- Sevcik finger placing in 1st
position, light finger action, Part 1 - BASICS cont. LESSON : R.H. Détaché ---------------------- Middle of bow détaché, Technique,
On the string bowing, Etudes Part 1 - BASICS cont. LESSON : L.H. Shifting ----------------------- Whole hand follows, Part 1 - BASICS cont. LESSON : R.H. Legato & String crossing --------------------------------------- Same exercise with 2, 4 and 8 note
legato, String crossing |
|
Send mail to leonid@globalnet.co.uk with
questions or comments about this web site.
|