Getting
Started ! Some Violin and bow holding tips !
This page : v.0.82 Jan 2000
You have a new violin and you're wondering where to begin. Well, once upon a
time, in the Paris
Conservatoire in 1850 there was a great violin teacher called
Allard who would give his beginners a long, even and deep G
string sound to play. In fact, by coincidence, I invented a piece called Elephant
parachutist, which also consists of an even open G sound, but if you've read the article on tonus, you'll know
that you can play an open D as well. We are choosing a G or a D in
order to experience a full and rich sound with plenty of bass. If
it goes a bit wrong at least it won't screech like the E string
might - which would seriously upset the cat !
 In the first picture you can
see what a G looks like in printed ( also called sheet ) music.
It's a minim : it's worth 2 beats - so you count 1, 2, and as you
say 3 you stop......but careful to play right up until you say 3
! Is it important to count ? NO .... I'm just trying to put you
off ! If you're playing on your own you must make an even sound
like a ship's horn - only not so loud !
In the first picture you can
see what a G looks like in printed ( also called sheet ) music.
It's a minim : it's worth 2 beats - so you count 1, 2, and as you
say 3 you stop......but careful to play right up until you say 3
! Is it important to count ? NO .... I'm just trying to put you
off ! If you're playing on your own you must make an even sound
like a ship's horn - only not so loud !
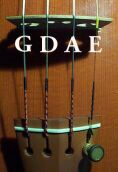 Now - where is the G string ? Well, look at the next
picture. If you look at your violin from the front it's the
thickest string and lies to the extreme left. It's also called
the fourth string and is the lowest and deepest note the violin can sing. It has such a special sound on the violin that
Wilhelmj transcribed Bach's Air to the G string....so it became
known as Bach's Air on a G string ! You will need to make sure
your violin is in tune so listen to this midi file (
or this one ) and
you will hear a G, D, A & E. These are the same sounds as
your 4 open strings. You will need to twist the tuning pegs / or
the fine tuners to tune up ! If in doubt ask a guitar player / or
any musical friend to help out. Soon there will be some midi
accompaniment files available to download from this site. To make
a note higher you twist the peg clockwise as you push it into the peg box so that it doesn't slip. ( corkscrew action )
Now - where is the G string ? Well, look at the next
picture. If you look at your violin from the front it's the
thickest string and lies to the extreme left. It's also called
the fourth string and is the lowest and deepest note the violin can sing. It has such a special sound on the violin that
Wilhelmj transcribed Bach's Air to the G string....so it became
known as Bach's Air on a G string ! You will need to make sure
your violin is in tune so listen to this midi file (
or this one ) and
you will hear a G, D, A & E. These are the same sounds as
your 4 open strings. You will need to twist the tuning pegs / or
the fine tuners to tune up ! If in doubt ask a guitar player / or
any musical friend to help out. Soon there will be some midi
accompaniment files available to download from this site. To make
a note higher you twist the peg clockwise as you push it into the peg box so that it doesn't slip. ( corkscrew action )
 Now, you need to tighten the horse
hairs on the bow. There are 150 of these, so don't worry if
one drops off ; there will still be 149 left. You tighten the
hairs by twisting the screw ( at the blunt end of the bow ! )
On the left you can see the hairs are not too tight - so that
the shape of the bow is retained. If you tighten the hairs
too much, the bow will become almost straight, as in Robin
Hood's bow ! The natural spring and strength of the bow is
retained if you just tighten it to no more than 1 cm. gap in
the middle. On the right you can see the screw at the bottom
of the picture. My bow is by a famous French maker called
Voirin, and it has Mother of Pearl inlaid at the tip of the
screw. The reason it is a good bow is that the wood is very
rich and dense, and the bow is designed so well, it keeps to
the strings and produces a great sound so easily. It's a bit
like a skier adhering to the snow, except violinists don't
usually break their necks if the bow comes off the string ! You don't need a
Voirin to start off, but just check, by looking down the length of the bow,
that it is straight, and doesn't have a pronounced curve to either the right
or the left.
Now, you need to tighten the horse
hairs on the bow. There are 150 of these, so don't worry if
one drops off ; there will still be 149 left. You tighten the
hairs by twisting the screw ( at the blunt end of the bow ! )
On the left you can see the hairs are not too tight - so that
the shape of the bow is retained. If you tighten the hairs
too much, the bow will become almost straight, as in Robin
Hood's bow ! The natural spring and strength of the bow is
retained if you just tighten it to no more than 1 cm. gap in
the middle. On the right you can see the screw at the bottom
of the picture. My bow is by a famous French maker called
Voirin, and it has Mother of Pearl inlaid at the tip of the
screw. The reason it is a good bow is that the wood is very
rich and dense, and the bow is designed so well, it keeps to
the strings and produces a great sound so easily. It's a bit
like a skier adhering to the snow, except violinists don't
usually break their necks if the bow comes off the string ! You don't need a
Voirin to start off, but just check, by looking down the length of the bow,
that it is straight, and doesn't have a pronounced curve to either the right
or the left.

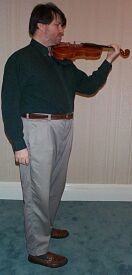
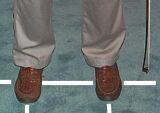 We can start to line up now
! Place each foot under each shoulder. Keep your feet parallel,
as if on a railway track. Maintain an even balance on both feet,
and feel them firmly on the ground. Don't try and play on one
foot, or on tip toe or any other precarious position, as violin playing is hard enough as it is ! Some performing violinists use a slightly
more advanced stance, though it was once considered a great
"Paganini" secret to maintain this evenly balanced
posture. Whatever happens, never lean on your right foot, as this
will burden your bowing arm.
We can start to line up now
! Place each foot under each shoulder. Keep your feet parallel,
as if on a railway track. Maintain an even balance on both feet,
and feel them firmly on the ground. Don't try and play on one
foot, or on tip toe or any other precarious position, as violin playing is hard enough as it is ! Some performing violinists use a slightly
more advanced stance, though it was once considered a great
"Paganini" secret to maintain this evenly balanced
posture. Whatever happens, never lean on your right foot, as this
will burden your bowing arm.
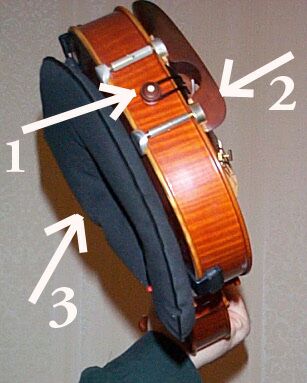 On the left is a picture
showing some important parts of the violin. 1) is the Button. 2)
is a chin rest which has feet both sides of the tailpiece, and 3)
is a soft air filled shoulder pad - called "Play-on-air". You can
start playing without a shoulder pad, but you may feel the violin
is more stable with one of these filling in that gap between
collarbone and violin. It's really important when you come to
fingering and changing position with your left hand, as it will
enable to support most of the weight of the violin, while
releasing your hold and support of the neck with your left hand
as you change position. For a chin rest ; there are many types on
the market to buy, but chose a fairly flat one, and possibly one that
allows you to place your chin as centrally as possible on the
violin. This is a very important concept, and Isaac Stern,
perhaps the greatest violinist alive uses a Hill type chin rest,
which allows him to place his head almost directly above the
tailpiece
On the left is a picture
showing some important parts of the violin. 1) is the Button. 2)
is a chin rest which has feet both sides of the tailpiece, and 3)
is a soft air filled shoulder pad - called "Play-on-air". You can
start playing without a shoulder pad, but you may feel the violin
is more stable with one of these filling in that gap between
collarbone and violin. It's really important when you come to
fingering and changing position with your left hand, as it will
enable to support most of the weight of the violin, while
releasing your hold and support of the neck with your left hand
as you change position. For a chin rest ; there are many types on
the market to buy, but chose a fairly flat one, and possibly one that
allows you to place your chin as centrally as possible on the
violin. This is a very important concept, and Isaac Stern,
perhaps the greatest violinist alive uses a Hill type chin rest,
which allows him to place his head almost directly above the
tailpiece
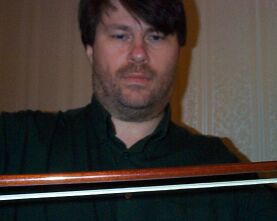
Item number 1) the button is very important when learning to
play the violin. It goes in the middle of your neck, where your Adam's apple is, and must stay in contact with your neck, with no
gap in between. I tell children that the violin button goes on top
of all the buttons on their shirt - at least aligned with them.
You will have to lift your head and turn it 45 degrees to the
left while you gently place the button in the middle of your
neck, and let the violin come to rest, touching your collarbone.
Don't let the violin fall away or droop down. Hold it flat and
horizontally for optimum bowing and sound.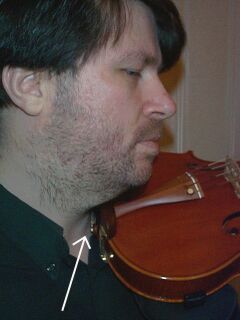
On the right you can see the white arrow pointing to the
button. I have left a gap in between neck and violin in order to
show how just where the button is placed. Normally there should
be no gap at all, and the violin should feel very handy and close
for comfortable playing to take place. On the right you may be
able to see I have tucked my shirt collar under the violin, so
that no clothes separate the violin from me. If you are wearing
polo-neck jumpers then find some more comfortable clothing than
will allow you to come in direct contact with the wood of your
violin. If the chin rest is causing an irritation on your skin,
make sure you do not have a plastic chin rest, and make sure you
are not squeezing the violin too hard. Just let the some of the
natural weight of your head fall on the chin rest. When you are
changing position, and your left hand is executing rapid passages
up and down the fingerboard, you may hold you neck more firmly on
the violin, pulling the violin up and back to assure a stable
platform ( fingerboard ) on which you can shift easily with a
light left hand.
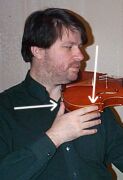 Left : It's a good
idea to leave your bow down for a second, and use your
right hand to steady the instrument. Hold the sides (
ribs ) of your violin with the index finger and thumb of
your right hand. This will give you a sensation of
stability, and confidence in holding the instrument. One
of the fears many violinists have is that of dropping the
violin. Notice how my head is upright, and pulling
slightly back. I am also looking towards the scroll or
fingerboard, and this helps the head maintain a good
healthy posture.
Left : It's a good
idea to leave your bow down for a second, and use your
right hand to steady the instrument. Hold the sides (
ribs ) of your violin with the index finger and thumb of
your right hand. This will give you a sensation of
stability, and confidence in holding the instrument. One
of the fears many violinists have is that of dropping the
violin. Notice how my head is upright, and pulling
slightly back. I am also looking towards the scroll or
fingerboard, and this helps the head maintain a good
healthy posture.
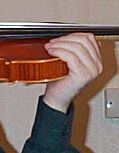
This is where you place your left hand if you are playing open
string pieces. It's a great way to feel secure, and ensure your
holding the violin in such a way you feel comfortable and easy.
Notice how the thumb lies the other side of the neck. Really, you
must just wrap your hand, like a paw, gently around the body of
the instrument, and keep it there firmly.
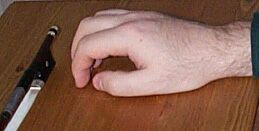 Next we come to bowing. You
don't have to get this all 100% right before having a go, but I
am putting quite a lot of information here so you have plenty of
knowledge and theory with which to improve - and of course just
go at whatever pace you feel comfortable with. On the left I have
placed my hand flat on a table top to show the correct attitude
of the thumb. The nail should point almost towards the tip of the
bow, and not down to the ground. This is a very natural position
of the hand. A badly twisted or contorted or rigid thumb can
compromise the freedom of the whole hand. I refer to the locking
of the hand by bending it in the wrong way ! Just keep your
thumbs flexible and very relaxed, and you won't strain your
wrists and hands !
Next we come to bowing. You
don't have to get this all 100% right before having a go, but I
am putting quite a lot of information here so you have plenty of
knowledge and theory with which to improve - and of course just
go at whatever pace you feel comfortable with. On the left I have
placed my hand flat on a table top to show the correct attitude
of the thumb. The nail should point almost towards the tip of the
bow, and not down to the ground. This is a very natural position
of the hand. A badly twisted or contorted or rigid thumb can
compromise the freedom of the whole hand. I refer to the locking
of the hand by bending it in the wrong way ! Just keep your
thumbs flexible and very relaxed, and you won't strain your
wrists and hands !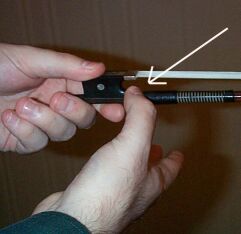
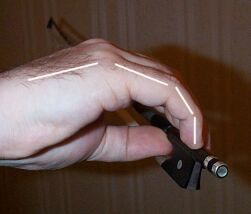
On the right you can see how I start placing the thumb first,
holding the bow upside down. The thumb must touch the wood, yet
also touch the leather grip and the frog at the same time. Notice how I am placing the thumb on its side, and I make sure it
doesn't poke through and come out the other side. All this is to
ensure flexibility and mobility of the thumb, especially, for
example, when playing détaché.
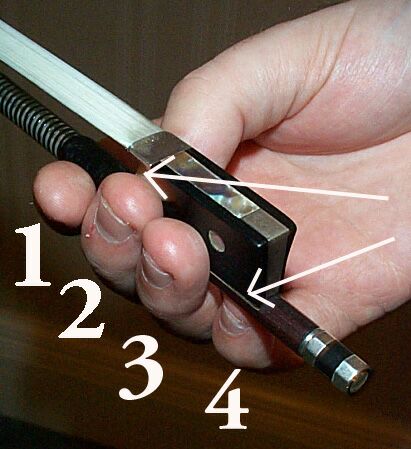
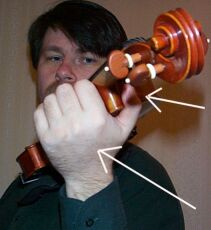
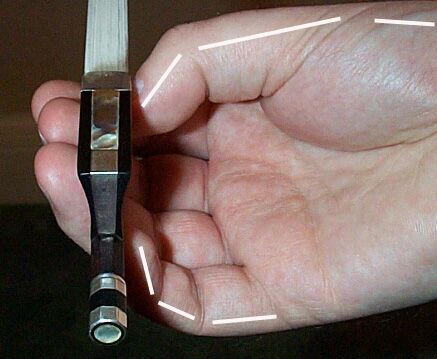
On the left : I have numbered the fingers. Notice how the
middle finger ( 2nd ) almost touches the metal guard ( top arrow
). Also it is the middle finger which is placed opposite the
thumb. Almost all teachers insist on this ; that the middle
finger and thumb form a ring. My first finger is wrapped around
the bow, mainly around it's first joint. In other words the joint
between first and second phalange. I have placed another arrow
pointing to the tip of the 4th finger which remains rounded and
in contact with the bow. This upside down bow hold is designed to
ensure the correct placement of all the fingers. Once they have
been placed, the bow is slowly tilted the right way up again,
passing through the vertical and down again,, very slowly , so
that the fingers can grow used to the changing balance of the bow
and hand.
Above : Another picture shows the natural bend
in the thumb and little finger.
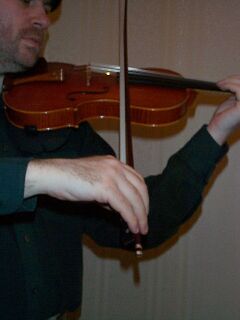
 Far left : Bad bowing angle at the heel
- and to its right - a good angle of the bow at the heel. On the
bad picture you may also notice a low wrist, which is responsible
for the conduct of the bow. It is very common not to have a
straight bow at the heel, yet at all times, the bow must be drawn
perpendicularly to the strings for the purest sound. This
principle was proved by Heifetz.
Far left : Bad bowing angle at the heel
- and to its right - a good angle of the bow at the heel. On the
bad picture you may also notice a low wrist, which is responsible
for the conduct of the bow. It is very common not to have a
straight bow at the heel, yet at all times, the bow must be drawn
perpendicularly to the strings for the purest sound. This
principle was proved by Heifetz.
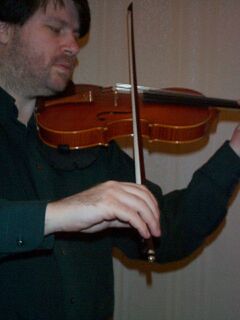
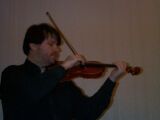
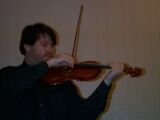
 To the right are two pictures of me
bowing. Notice the point of contact ( the exact point at which
the bow touches the string ). On the left picture I am bowing
very fast and lightly, with only a few bow hairs, almost over the
fingerboard. However, on the extreme right, I am bowing a mezzo
forte ( louder ) ; my wrist is leaning into the string, I am
using all the hairs flat on the string, and the point of contact
is exactly half way between the bridge and fingerboard. Slower
and more concentrated sounds can be obtained by using all one's
weight and bowing even closer to the bridge.
To the right are two pictures of me
bowing. Notice the point of contact ( the exact point at which
the bow touches the string ). On the left picture I am bowing
very fast and lightly, with only a few bow hairs, almost over the
fingerboard. However, on the extreme right, I am bowing a mezzo
forte ( louder ) ; my wrist is leaning into the string, I am
using all the hairs flat on the string, and the point of contact
is exactly half way between the bridge and fingerboard. Slower
and more concentrated sounds can be obtained by using all one's
weight and bowing even closer to the bridge.
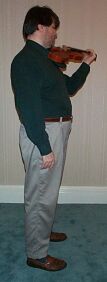
A wrong and a right posture : On the extreme left my
torso is twisted to the right and my shoulders are
misaligned with my hips. On the right, I have placed my
shoulders on the same axis as my feet. This is obviously
healthier, and more a comfortable stance to hold. Of
course one can also twist the shoulders too far to the
left side. In several cases, twisted spines backs and
other muscles are sometimes the cause of serious
discomfort, and imbalance and even injury. Just remember,
that the violin is extremely difficult to master - so
rest frequently, and do not play for hours on end, unless
you are very experienced !
More photos on posture