A learning document for programming in 1456 object code for use with the DVB-MHP platform.
William Overington
Copyright 2002 William Overington
Friday 11 January 2002
This document is designed as a learning document for programming in 1456 object code for use with the DVB-MHP platform in the hope that it will be possible to use such a skill to prepare programs for broadcasting in due course. The learning is in web based simulation.
Please note that this document is presented for use in programming simulations on the web. There is no guarantee whatsoever that it will ever be possible to program in 1456 object code directly for the DVB-MHP platform or even if it becomes possible that any such programs then produced will ever actually be broadcast. This is because there are various steps to doing so that need to be resolved and they are not all steps that I can take on my own decision. However, if it does become possible to produce a 1456 DVB-MHP landscape and if space and time on a broadcaster's object carousel is forthcoming, please know that the 1456 object code commands being used in this learning document would be exactly the same for use on a DVB-MHP system as on the web, though these particular programs might need a few changes to some of the numbers in order to take into account that these simulations are being done on a half scale simulated screen.
This document uses the Astrogen program to produce the simulations.
The Astrogen program for generating 1456 object code programs that simulate the DVB-MHP system. provides information on using the Astrogen program.
This document assumes that the reader has a basic familiarity with 1456 object code and the commands in the first three documents available at 1456 object code documents index. in this webspace. Those three documents are as follows.
Regarding the last document above, the colours corresponding to colours 14, 15 and 16 have been changed since that document was written back in the year 2000. The colour table in this present document is the up to date set of colours.
Here is a link to the Astrogen program. This document also has links to two copies of the Astrogen program modified so as to have the software developed in this project preloaded.
The project is a learning project to produce a 1456 object code program that draws lines on the screen in response to presses of the four arrow keys. In the first stage the lines are yellow. In the second stage the colour of the lines can be changed, so that a choice of twelve colours is available. In the third stage the choice of colours is extended to sixteen colours, using the green button as an escape mechanism so that the arrow keys can then be used as a means to enter four additional colours.
This project is based around the ast00901 1456 applet landscape which has just the DVB-MHP minimum set of input events of 20 buttons and no mouse events. The ast00901 1456 applet landscape is capable of accepting mouse events when the mouse simulation is on. However, the default situation for the ast00901 1456 applet landscape is that the mouse simulation is off. This project uses only buttons from the minimum set of input events and, unless a reader turns the mouse simulation on, the mouse simulation remains off.
As mentioned above, the project is a learning project to produce a 1456 object code program that draws lines on the screen in response to presses of the four arrow keys.
Suppose that the line is to start in the centre of the screen. In this simulation that point is at coordinates, x=256 pixels from the left and y=144 pixels down from the top.
So, we include in the start up of the program, at label 1, represented by 1: in the software, an instruction to the eutodraw system to move to the point x=256, y=144 without drawing any line.
This software is as follows.
The program needs to keep a record of where the present tip of the pen is located so that the new position of the tip of the pen may be computed when an arrow key is pushed. Let us decide to store the x coordinate of the pen tip in mi1456[23] and the y coordinate of the pen tip in mi1456[24]. So, the software to store the initial position of the pen tip in these locations is as follows.
This can be added in to the software to move the pen tip to the starting point so as to give the following.
However, as 256 and 144 are each loaded into the ai1456 register simply for a copy to be stored somewhere else, the software may be shortened to give the following.
This is useful, for, should it be desired at some later time, to modify the program so as to have a different start point, then the start point is in only one place. A note about the meanings of the data may be included in a comment in the program if so desired. A comment in 1456 object code is included between wavy brackets { and }. An example would be as follows.
We now need to add software to respond to the pushes of the arrow keys. The four arrow keys are coded in the ast00901 1456 applet landscape so as to cause entry to the 1456 object code program at the following entry points.
The up key produces entry at label 61, the down key produces entry at label 62, the left key produces entry at label 63, the down key produces entry at label 64.
Each of these keys needs to produce a different effect in as far as they alter the position of the tip of the drawing pen, yet each also then needs to draw a line to the new position of the tip of the drawing pen.
The method chosen for each arrow key is to first call a subroutine to move to the present position of the pen tip, this subroutine being placed at label 68, then to update one of the two coordinates according to which arrow key is pushed so that a movement of ten pixels in that direction is made, then to call a subroutine to draw a yellow line to the new position of the pen tip, this subroutine being placed at label 69. The ten pixels is chosen so as to give sufficient movement to show clear movement on the screen yet also give sufficient scope for the pen to be moved around without going off the screen.
Consider the code for the up key. This is placed at label 61. First the subroutine at label 68 is called, then the y coordinate is decreased by ten pixels, then the subroutine at label 69 is called.
Adding the software for the other arrow keys gives the following.
The two subroutines may be added. Please note that yellow is colour 4 in the 1456 object code colour set.
Thus the whole program becomes as follows.
This can now be entered into the Astrogen program and run. I have, in fact, prepared a preloaded version of the Astrogen program containing the above software and it is available here.
Please click on the link below, go about half way down the page that is displayed, and then click on the button that states
Please generate a 1456 object code web based DVB-MHP simulation
and, all being well, a new page should be generated for you.
On that new page, please click on the four arrow keys and a yellow line will be drawn that reacts to the four keys.
The Astrogen program, preloaded to draw yellow lines.
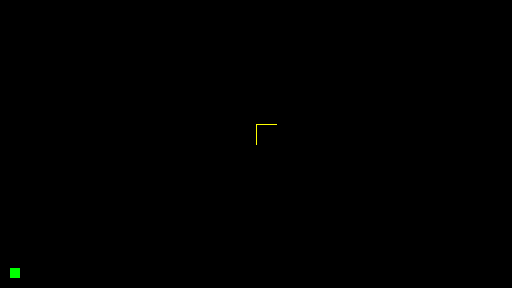
Here is a display obtained in testing.
Response to up, up, right, right, down, down, left, down, right.
The program will now be extended so as to be able to change colours.
Colours and their entry is considered in the document
Colour codes, both generally and in conjunction with the
Astrolabe Channel numerical pointer.
and although the Astrolabe Channel character codes are not being used in this program,
the key pushes for entering the colours are chosen to be the same as in that document.
The colours corresponding to buttons 0 through to 9 are as follows.
The Enter and Teletext keys my also be used to enter colours.
Also, the up, down, left and right keys may be used to enter colours, though,
as will be discussed, this would mean a clash with the use of the arrow keys
to indicate directions of movement.
This matter is left to the third part of this learning document, where the
green coloured button will be used to produce an escape so that the arrow
keys may be used to enter colours.
That is really only being done here as a learning example of technique in
1456 object code programming, to show how 20 buttons may be used to input
more than 20 different inputs to a program.
For this second part of the learning document, let us use just the 0 through to 9
buttons and the Enter and Teletext buttons to enter colour information to the program.
In this 1456 applet landscape, the keys 0 through to 9 cause entry to
the 1456 object code program at the entry points 20 through to 29 respectively.
The first step is to decide where to store the colour of the pen tip at any time.
Let us choose mi1456[17] as the location.
So, let us first modify the program developed so far so that instead of always
drawing in yellow, the program will always draw in the colour whose code is stored
in the mi1456[17] location.
That colour code is simply an integer.
In addition, let us alter the start up routine so that the colour code for yellow,
that is 4, is stored in mi1456[17] at start up, so that the modified program has
the same effect as before.
The whole program previously developed is as follows.
The whole program now becomes as follows.
The only changes from the diagram above in the diagram below are in the top line
and in the bottom line.
The ten digit keys are now encoded.
Consider for example the 3 key.
This must be encoded to store the integer 3 into mi1456[17].
The entry point is label 23.
Thus the ten digit keys are coded as follows.
The Enter key and the Teletext key are coded as follows.
The software for the digit keys is regular in format.
Realizing that a 1456 object code command that would load into the ai1456 register
the numerical code number of the label at which entry to the software occured would
be helpful here and in other situations, I have added into the 1456 Engine the
command &! which carries out that function.
Thus the coding for the ten digit keys can be altered to give the following.
The 20&- is so as to subtract 20 from the numerical code of the label at which entry
occured.
So the program to draw lines in twelve different colours, including black, is as follows.
This can now be entered into the Astrogen program and run.
I have, in fact, prepared a preloaded version of the Astrogen program containing the
above software and it is available here.
Please click on the link below, go about half way down the page that is displayed,
and then click on the button that states
Please generate a 1456 object code web based DVB-MHP simulation
and, all being well, a new page should be generated for you.
On that new page, please click on the four arrow keys and a yellow line will be
drawn that reacts to the four keys.
Please then click on any of the digit keys or the Enter key or the Teletext key
and then again click on the arrow keys.
Lines in various colours can now be drawn.
Please note that it is not necessary to start with a yellow line.
It is possible to change colour before drawing of the line starts.
The Astrogen program, preloaded to draw lines of various colours.
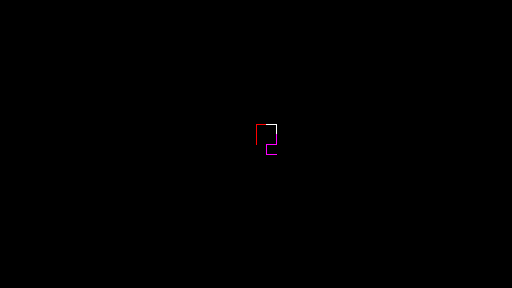
Here is a display obtained in testing.
Response to 2, up, up, right, 9, right, down, 7, down, left, down, right.
The third part of this learning document now looks at adding in an escape feature
using the green button, so that the up, down, left and right keys may be used as
a method of entering four extra colours, namely cyan, pink, dark grey and light grey
respectively.
This extra facility may be approached in the following manner.
The program needs to retain knowledge between button pushes as to whether the next
arrow key pressed is to be treated as a direction movement or as a colour code.
Let us choose to use mi1456[18] to contain this information.
If mi1456[18] contains 0 then the arrow key means a direction.
If mi1456[18] contains 1 then the arrow key means a colour code.
The start up of the program needs to set mi1456[18] to 0, so that the arrow keys
start off as indicating directions.
The green button, leading to software at label 52 being obeyed, needs to set the
contents of mi1456[18] to 1.
The green button will also cause a green filled square to be displayed in the bottom left
corner of the screen, to indicate that an escape situation is in action.
All four of the arrow keys now need to have their software altered.
Each arrow key needs to test whether the escape situation is in action.
If it is not, then continue as before, if it is, then carry out a new colour code
setting action and then remove the green filled square from the bottom right of the screen.
However, there is a further consideration.
What is to happen if a user pushes the green button and then pushes, say, the 3 button?
A good idea is for that too to cancel the escape sequence.
The start up software is modified to become as follows.
Let us now design the green filled square.
Let us make it 10 pixels in size and place it 10 pixels in from the left and bottom edges
of the screen.
So, the x coordinate of the top left corner of the green filled square is 10.
The y coordinate is rather harder to calculate.
The last row of the black screen is row 287 as the 288 rows are numbered from 0 through to 287.
The 10 pixels deep black area below the green filled square is in rows 278 up to 287 inclusive.
The 10 pixels deep green filled square is in rows 268 up to 277 inclusive.
So the y coordinate of the top left corner of the green filled square is 268.
So the software to draw the green filled square is as follows, as green is colour 5 in the
1456 object code system.
The software to draw a black filled square in the same place is as follows, as black is
colour 0 in the 1456 object code system.
The green filled square is removed from the screen by drawing a black filled square
on top of it.
So the software to set the escape flag, that is to set mi1456[18] to have the value 1,
and to draw the green filled square in response to a push of the green button is as follows.
That is fine as there is only one action that will set the escape flag and draw the
green filled square.
However, drawing the black filled square can occur after any of sixteen different keys have
been pushed, so let us place it in a subroutine that will test the value of mi1456[18]
and if it is 1 then set it to 0 and draw the black filled square.
Here is such a subroutine.
The value in mi1456[18] is copied into ai1456.
The 1&E carries out a test of the contents of ai1456 for equality with the number 1,
setting the linkflag1456 variable as true or false depending on the result of the test.
The 96!J is a conditional jump to label 96, jumping only takes place if linkflag1456 has
the value true.
The software for the digit keys and the software for the Enter key and the Teletext key
have a call to the subroutine added to them.
The software for the four arrow keys before modification is as follows.
Now it must be modified, so that each arrow key first tests to find out if the escape flag
is set and if it is goes to another label and changes the colour code and cancels the
escape flag.
In cancelling the escape flag there is no need to test whether it is set as at this point
in the program it must be set, so instead of calling the subroutine at label 95 we call
it at label 96 instead.
So we can have the following for the software for the arrow keys.
The top four lines have all been altered from those in the diagram above.
The code numbers for cyan, pink, dark grey and light grey are 10, 11, 12 and 13.
Please note that the subroutines at labels 68 and 69 have not been altered.
So, the whole program becomes as below.
This can now be entered into the Astrogen program and run.
I have, in fact, prepared a preloaded version of the Astrogen program containing the
above software and it is available here.
Please click on the link, go about half way down the page that is displayed,
and then click on the button that states
Please generate a 1456 object code web based DVB-MHP simulation
and, all being well, a new page should be generated for you.
On that new page, please click on the four arrow keys and a yellow line will be
drawn that reacts to the four keys.
Now, please click on the green button and note that the green filled square appears in the
bottom right corner of the screen.
Now use one of the arrow keys to change colour.
As a first experiment up or down is probably best as they will produce cyan and pink
respectively, whereas left and right produce dark grey and light grey respectively
and they do not show up so well on the black screen.
Please note that it is not necessary to start with a yellow line.
It is possible to change colour before drawing of the line starts.
The Astrogen program, preloaded to draw lines of additional colours.
Here are two displays obtained in testing.
Suppose that one starts drawing a line and then wishes to change colour to cyan.
Response to up, up, right, right, green.
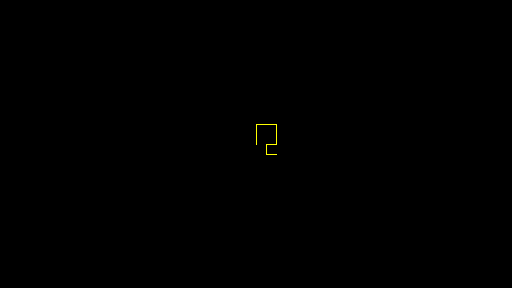
Here is a display obtained in testing.
Response to up, up, right, right, green, up, down, down, right.
In the above example, please note that the third up command is immediately after
the push of the green button and so is used to signal a colour change to cyan
instead of an upwards movement of the pen tip on the screen.
The program in this document is an introductory learning example.
A full program would need additional checks to protect against taking the pen off
the screen and an on-screen guide to the user as to how to use the program.
Copyright 2002 William Overington
This file is accessible as follows.
0
black
1
brown
2
red
3
orange
4
yellow
5
green
6
blue
7
magenta
8
grey
9
white
Enter
lavender
Teletext
mint
up
cyan
down
pink
left
dark grey
right
light grey