Issue 4, June 1984 - Casio Synthesiser Interface
| Home | Contents | KwikPik |

Sweet sounds and Spectrums aren't usually words uttered in the same breath! However, the program shown here, courtesy of Sam & Simon Goodwin, allows you to connect any Spectrum to the light-pen port of a Casio synthesiser, giving you a versatile new peripheral. 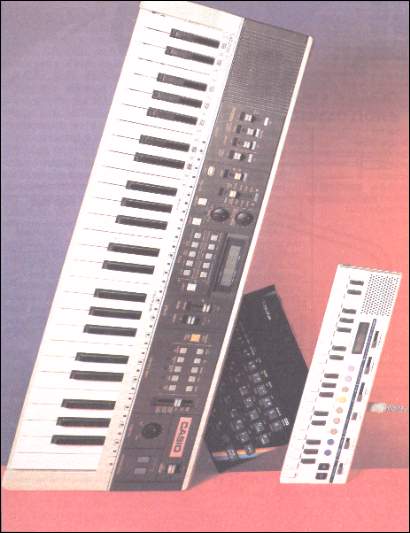
|
The synthesiser can tell pitches from rhythms by the looking at the start of the data - the hexadecimal sequence '0408' prefixes the pitch information, and '0404'
marks the rhythm data. There is scope for further experimentation here since we suspect that larger synthesisers use the other values to represent chords - the VL-5 only allows you to load monophonic music (although you can play along with it once it is loaded). Bar coded music is normally stored as a number of musical 'bars', each with its own start and end marker. This is convenient since it means that Casio doesn't have to print enormously wide books with bar codes on them - they can split a tune up over more than one line. However, the Spectrum doesn't need to print the music and, consequently, the entire tune entered can be transferred as a single bar. You could use multiple bars by altering the third digit of the start marker. For example, 0414 marks the second bar of rhythm information, and 04A8 would prefix the eleventh bar of melody. The Casio uses an 'extra' bit at the end of each bar to indicate whether or not there is another bar to come, so that must also be set appropriately. MAKING NOTESEach pitch is represented by two hexadecimal digits. The first digit is the note number in the octave: a value from 1 to 12 (Hex 'C'). The Note Codes table summarises the relationship between this digit and the note produced. The value zero represents a 'rest' (silent pause). The hex digit 'D' (13) tells the synthesiser to switch on the automatic rhythm generator.The second digit associated with each pitch tells the computer the octave number of the note. Use the value zero if no octave number is needed - eg. for a rest. Most of the pre- supplied sounds allow four different octaves to be specified, using the values '4' through '7'; but 'flute', 'violin' and 'pretty' can only be generated over a three octave range - the value '7' always produces a top C note if specified for one of those sounds. The use of values between '4' and '7' hints at other capabilities of the format - presumably, further octave values can be selected on synthesisers more versatile than the VL-5. As a simple example, to specify two notes an octave apart in pitch, you type "04081617". Once you press Enter, the information is automatically converted and transmitted to the synthesiser | |
|---|---|---|
The best news of all is that the entire program to carry out this wondrous interfacing task is only about a dozen lines long (see the listing further on). The program was tested using a Casio VL-5 polyphonic synthesiser and a 16K Spectrum with Interface 1 connected. With this configuration no extra hardware is needed, other than a couple of plugs and some wire. It should be
possible to use a cassette recorder or amplifier in place of Interface 1 if you've still to purchase (or receive!) the interface.
REFLECTIONSThe Casio light-pen produces a pulse |
of electricity whenever it passes over a
reflective surface. So, armed with the catalogue of tunes supplied with the
synthesiser, the first problem was to work out the pattern used to transfer information. It turned out that tunes are stored in eight-bit bytes, each composed of two four-bit sections. Pitch information is stored separately from rhythm data - you load the frequencies of notes to be used independently from the durations. Because of the four-bit basis for the information, we chose to use hexadecimal (base 16) to represent values sent to the synthesiser. | |

- you'll see the display border flash as the transfer takes place. The VL-5 then plays a short musical 'jingle' to signal that the information was received without error; a low note sounds if there's something wrong with it. The end of a bar of either pitch or rhythm data is marked by a hex 'F' digit, followed by a single digit 'checksum'. Both are automatically produced by the program, so you don't need to type the end marker when you enter the pitch or rhythm data. EASY RHYTHMThe rhythm information is likewise transferred as a sequence of eight-bit values. After the prefix '0404', subsequent pairs of hex digits represent 240 possible note durations. Only 240 values are allowed since any value starting with the hex character 'F' is treated as an end-marker. This wouldn't matter much, were it not for the fact that the values are stored 'backwards' - the first digit represents the units and the second the multiples of 16! This means, for example, that you can represent the durations '0' to 'E' (14 decimal), but not 15 which would be sent as 'F0'. Likewise the values 31, 47 and so on, are also forbidden.The range of durations is ample for most music - a value of 134 (Hex '68') produced a note lasting 13 seconds on the VL-5 when it was set to slow tempo. Of course, the slider control can be used to make fine alterations in the tempo of music once it has been transferred. The value '00' produced a note so short that it was barely perceptible. THE PROGRAMThe program listed by Sam Goodwin was written for speed and conciseness rather than legibility. Thus, annotation is provided for those who wish to adapt it - perhaps to produce computer- generated music, or even a full-scale synthesiser control program.WIRING UPThe diagram shows the wiring needed to connect your Interface 1 to a Casio VL-5. The socket on the Casio is a rather odd variety 4-pin DIN one, but that shouldn't matter too much since most of you will, no doubt, simply poke the wires into the socket and trust to luck! For your information, though, the plug is available for a few pence from Maplin Electronic Supplies, catalogue number HH26D.Make sure that the signal conductor from the Spectrum - the very end of the jack-plug - goes to the small socket of the DIN plug, rather than the shield. The diagram of the DIN plug assumes |
| ||||||||||||||||||||||||||||||||||||
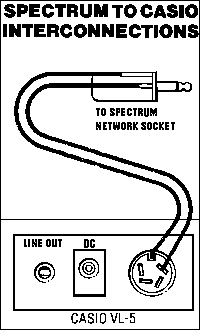
This is all the wiring you need to connect your Interface 1 to a Casio VL-5. The socket on the Casio is a rather odd variety of 4-pin DIN. that you're soldering it with the pins pointing away from you. The connector at the Spectrum end is a humble 3.5mm jack plug, which should be inserted into the network socket. If you haven't got an Interface 1, don't despair - you can control the VL-5 via the Spectrum cassette port, using a small amplifier to step up the signal. Alter line 510 to read "OUT 20,-("0"=A$(A)): NEXT A" if you don't intend using the Interface 1. If your cassette recorder will amplify Spectrum sound effects, a wire from its earphone socket should give sufficient voltage (about 3 volts peak- to- peak) to drive the synthesiser. Alternatively, a small transistor amplifier (such as an intercom or baby-alarm) should work adequately if you turn it up loud and |
take the signal for the Casio from the loudspeaker.
PRINTING BAR CODESIf your ZX printer is on good form, it's actually possible to print out bar codes. Amazingly enough, the resolution of the printer is usually good enough to read them as well - so long as you use good paper and avoid smudging the printout, that is. Line 520 demonstrates this, although it only works for small tunes since it is difficult to imagine why anyone should want to print musical bar codes! Enter your music in the usual way, and when the program STOPs after the music has been transmitted, type CONT (on the C key). The bar codes should appear on the screen. Type COPY to transfer them to the printer.The one-line printing routine will only handle short bursts of music, since it simply prepares a single screen of data.
| ||||||||||||||||||||||||||||||||||||
|
It should not be difficult to adapt the technique to produce longer bar codes. The routine deliberately uses the full width of the paper, so a succession of screens can be printed one after another. Another advantage of using the whole width is that it gives more chance of success with a smudged listing - if a pattern won't load at first, try |
moving the bar code reader across a different column of the printout. Producing bar codes with the ZX printer can be a rather 'hit-or-miss' process, but perseverance pays off eventually! SAFETY NOTESThe chance of damage to either synthesiser or computer is very slight when using this technique, but dire consequences could result if you are either very imaginative or very unlucky. To minimise the chance of problems, always use the synthesiser on battery power while it's connected to the Spectrum (this reduces the risk of damage caused by faulty mains wiring). Always double- check your connections |
between the two devices, and never connect them together while either is turned on. You can damage your Interface 1 by shorting the network output, so be especially careful that you've not accidentally connected the two wires together. In our tests we've experienced no problems but, of course, Your Spectrum can't take responsibility if you blow up one of your 'toys' in the course of experimentation. At least you know that it's possible to interface the two machines - just spare a thought for us fiddlers and the projects that didn't work, as we sit in the midst of an expensive pile of broken robot- arms, ZX80s and central- heating controllers! |

|
NOTA BENEWhen this article landed on the editor's desk, cries of glee emitted from the would-be Keith Emersons who rushed down to McDonald's Stores of Oxford Street to borrow a VL-5. No problem - the device worked perfectly with the Spectrum, and within minutes the YS office looked like a scene out of Fame! However, although you can still probably pick up a VL-5 from your local electronics shop, Casio have ceased making this model. But, Casio do include other synthesisers in their range with a light pen port and, just to prove that the program works for these as well, YS tested the MT-70 model which you'll see illustrated within this article. | |