Issue 19, October 1985 - Highway Encounter
| Home | Contents | KwikPik |
| R O A D R U N N E R Beep, beep! Vortex's new game, Highway Encounter goes on the road. Join Ross Holman as he follows the Highway code ... | |||
|---|---|---|---|
| H A C K E R ' S G U I D E | |||
| The cyclops aliens shouldn't cause too many problems. They only change direction if they hit something. |
There's always someone digging up the road. Well, this time it's Dave Nicholls who's taken the tarmac off and started roadworks on Highway Encounter!It's a well known fact that practice makes perfect - and I don't want any sarky comments about why it didn't work for me! Costa Panayi, the programmer of Highway Encounter, has certainly been practising since he wrote Android 1 and he's realised the advantages of a modular structured program. Now, I know I keep going on about structured programming but it really is worthwhile sitting down and thinking things through properly before you start writing. Just imagine writing something like Alien 8 or Highway Encounter using the Basic hack and try technique. It would more than likely need about half a meg of ROM to run - that's if you ever got it going - and you might just finish it before the turn of the century!Highway Encounter also uses another technique that's becoming increasingly popular - the tabular approach to data storage. Here, there are more tables than in your local MacDonalds - the object tables and the Vorton tables both use a similar format so that the same routines can be used to handle both. These tables only take up about 4K but they contain 260 objects along the road as well as the five Vortons. The graphics are handled using the now customary 'stick em in a buffer and then copy em to the screen' method. That does away with the problems of replacing the hits of screen that have been overwritten. Costa has, shock horror, actually used a more efficient method than Ultimate's - instead of rewriting the whole screen every frame, he keeps a separate buffer that flags the character squares that have been changed, and only updates those. That's how he gets the game to run so fast - though the number of calculations involved means that very full screens tend to slow down. The 3D effect is generated in the usual way, by printing from back to front so that the closer objects hide the ones behind them. To see how this works, take a look at the very flash title |
screen. This builds up the name
of the game on screen using a
series of sprite frames - it's
actually the reverse of the
'destruct' sequence for a block. Highway Encounter avoids all problems with attributes by using the popular method of having only two colours for the moving parts of the screen. But there is a problem with this - in order to produce realistic images, the graphics designer is forced to leave 'holes' in his sprites. OK, so this also happens when normal colours are used but it's usually sorted out by careful palette selection. So, what's the big deal? Well, if a sprite with a hole (no mint jokes, please) passes over a solid background, it'll appear to be transparent and the background will show through. Let me fill you in on how the problem's solved. Extra info is included with the sprite data that takes the form of a mask and that's where the term 'bit masked' sprites comes from. This tells the routine that puts the sprite on screen which parts of the screen need to be wiped out. That old fave, Boolean logic is used and the whole operation is done using a couple of extra instructions for each byte of data. First, the background is ANDed with the mask - there's a bit set for each pixel that's to be left on - and then ORed with the actual sprite data before being reloaded into the screen or buffer. By the way, these are real ANDs and ORs not the ones used in Basic. It's usual to leave a one pixel border round the sprite so that it stands out clearly. The disadvantage is that you need a mask for every sprite frame so the amount of data is doubled. But as you can see from Highway Encounter, the results are well worth it. If you want to find out more about masks, have a look at Chris Wood's article in this issue. And now you're wondering why there are no POKEs for Highway Encounter. Well, Vortex has told us that they intend to remaster the game every thousand copies and change some of the data. That means that any POKEs we print now are bound not to work for the version you've just bought. But keep your eyes on Hacking Away - someone's bound to send in different sets of POKEs for you to try out on your copy. | |
| Eye, eye. These are much nastier as they're programmed to change direction after a random time. | |||
| Heard the one about the wide mouthed frog? - these are related. They change direction after very short random times. | |||
| Naaasty. The discs bob and weave and give the impression that they can home in on you. | |||
| If you try to shoot the brick walls they just crumble, slowly disintegrating into thin air. | |||
| You can move the barrels by pushing or shooting them. | |||
| The blocks can only be moved by shooting them. Nobody pushes them around. | |||
| If you let the aliens pass you by, don't be at all surprised if your lives start disappearing while you're not even on the same screen. | Pow, pow, power. You've only got three shots at any one time but they
replenish as soon as each one makes contact. | And if you think it still looks easy, just remember that you have to do it all against the clock! | |
Click Here 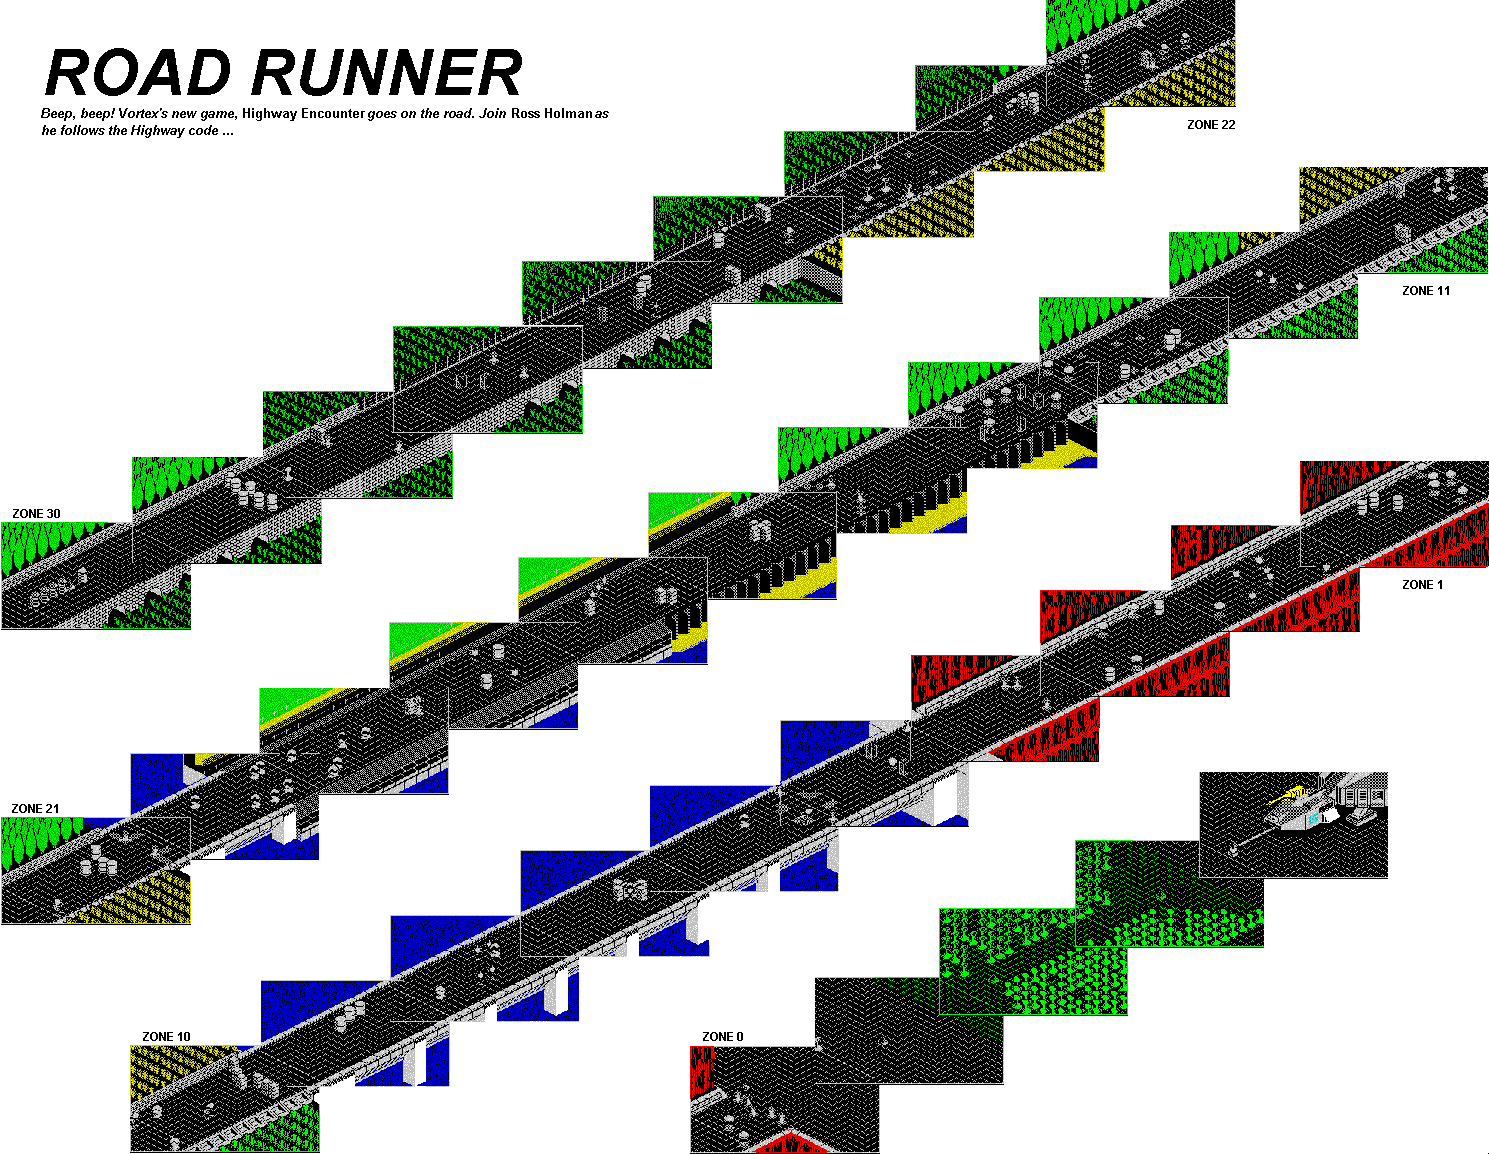
for the BIG (124kb) picture | |||
| ZONE 30 | If you're looking for originality, it starts here. You've got four lives
but don't expect them to sit patiently at the bottom of the screen -
they're coming with you! Here they are lining up behind the Lasertron as the master Vorton looks on. And as soon as they're off, get ready to roll yourself - you'll be riding shotgun on the road to Zone zero. | ||
| ZONE 29 | Your Vortons have run slap bang into the first barrier. You can move
the oil drums by pushin' or shootin' 'em, but it's an idea to leave
your troops behind them. With the Vortons tucked up safely, you can advance alone into the next zone. There the first aliens are ready and waiting to be blasted into oblivion. | ||
| ZONE 28 | Enter this zone on the central track and prepare for battle. Three one
eyed aliens come straight for you but they're pretty thick and can only
move in straight lines until they hit something. Take out the first one, then rotate to one side and catch another on the run. The last one plus a fourth straggler can be picked off as they return to this zone. | ||
| ZONE 27 | Here it's a case of the immovable objects meeting the irresistible force.
The glass cubes can't be moved, so you've either got to go round them
or through the gap in the middle. Great balls of fire. Vorton's aren't flameproof so steer clear of the flickering torches. | ||
| ZONE 26 | Here you'll have to use some Knight Lore type tactics of moving objects
around the screen. It's the only way to clear a safe passage up the
middle of the road for the Lasertron. If you let any aliens escape alive, go back and get 'em. They'll only cause trouble later if you get soft-hearted about zapping them in the back. Push the two barrels between the pulsating mines and the brick columns. Then a few quick spurts on the laser and another sector's made safe. | ||
| ZONE 25 | First time out, it's an idea to build up confidence by taking cover behind the walls and zapping the aliens as they come past. Or you can always use the barrel as a shield. Sneaky that! | ||
| ZONE 24 | Meet the two-eyed aliens! It's an idea to fire off a few bursts from the
previous zone to pick some of them off before you enter this screen. C'mon, make my day punk! Stay cool and stop as soon as you enter the zone - then you can shoot the aliens in a calm and calculated fashion. And watch out for the tiles - you can't run over them but they make the aliens bounce a bit. | ||
| ZONE 23 | The eyes have it. Usually this zone's full of the two-eyed terrors, so
wipe them out pronto. Move to either edge of the road and fire along it
- they'll meet their deaths like lemmings. Release the mine by shooting away one of the stacks and then push or shoot the other one so that the mine's trapped against the wall. | ||
| ZONE 22 | At last, an easy screen! Just watch out for the aliens and power on through. | ||
| ZONE 21 | It's all been a summer holiday up till now - from here on the meanies get
really mean. Fire into the next zone to zap a few before going in -
you'll hear when you hit one. It's a good idea at this point to belt on back to the beginning and collect your spare lives and the Lasertron. They'll be safe here behind the barrels. | ||
| ZONE 20 | As you enter this zone, you'll find that there'll still be a couple of aliens waiting to shoot their mouths off at you. Stay still and blast them as they move towards you. | ||
| ZONE 19 | No through road! If you don't want to go to the wall, you can blast the
brickwork between the flames before trekkin' on through. Be extra careful if you're on your last life especially if you're pushing the Lasertron. If you're not exactly on the centre line, you'll have had your chips. Line up the centre line with the groove on the Vorton's back. | ||
| ZONE 18 | A really nice touch and one that sets it apart from the Ultimate games,
is that you can move objects and fire from one screen into another. But
be careful if you fire behind you - you won't know what you've moved
till it's too late. It's a real doddle with these mines. Shoot the right hand barrel so that the two mines are bouncing off it. Then shift it over to the left side of the road to trap them. | ||
| ZONE 17 | Don't get too trigger happy here - you can only shift the blocks by
shooting them and you don't want to move them too far, do you? It's not too tricky to trap the mines once you've used the block on the left to capture the first one. Practice makes sort of perfect. | ||
| ZONE 16 | There's an alien here - a particularly vicious disc - but he's playing
hide 'n' seek inside the blocks. A sort of out of sight, out of mined! Now you can either release the nasty and hope you do it to him before he does it to you or you can be sneaky! Blast one of the blocks so you can just see the disc, then line up on the diagonal and destroy it. | ||
| ZONE 15 | If you make it to this screen on the third time round, you'll really
know what it feels like to sweat. The discs are definitely the deadliest of your enemies so it's an idea to do the dirty on them from a safe distance - like the preceding screen. | ||
| ZONE 14 | If you raced through the last screen, you mat still find some discs here. And boy, are they mad. Use the glass cubes for cover but be careful that they don't block your shots. | ||
| ZONE 13 | Cooeee, Mr Shifter. You'll need these barrels in the next zone, so don't hang about drinking cups of tea - get shifting! | ||
| ZONE 12 | Oh, very tricky - diagonally moving mines! Your best bet is to trap them
against the left wall with the barrels from the previous zone. This screen's all down to trial and error - and you can expect to make plenty of errors before getting it right. Go on, have another go - just one for the road! | ||
| ZONE 11 | Stick to the centre and the first two aliens will zoom past giving you just enough time to stop and shoot 'em. Hah! | ||
| ZONE 10 | This is a good place to beetle off back down the highway and collect the Lasertron and your spare lives - if you've got any left, of course. | ||
| ZONE 9 | Make sure this isn't one bridge too far for you - beware the bigmouths
on the bulwarks! Rumours that these aliens were based on Troubleshootin' Pete are completely unfounded. But watch that mouth move! | ||
| ZONE 8 | Use the barrels and a pile of bricks to back the mines up against the
wall. You can't destroy them, so just keep them out of harm's way. Keep the central zone clear. The Lasertron and the spare Vortons never deviate from the centre path, so make sure nothing comes in their way. | ||
| ZONE 7 | Now you're getting close but this is the calm before the storm. Best to
take a breather here before the final onslaught. There are hidden nasties here but you can't keep the trap shut forever. Just make sure that you've killed all their comrades before tackling them. A good move is to keep on firing up the left hand edge till you've annihilated the lot. | ||
| ZONE 6 | Luckily the aliens are pretty gormless in this zone. Put the brakes on just past the raised tiles and pick off as many of the daft adas as possible. | ||
| ZONE 5 | To trap the mine you'll need to bring a pile of blocks from Zone 7 and then indulge in a spot of diagonal firing. Make sure you trap the mine on the left or your Lasertron won't go through the gap. | ||
| ZONE 4 | The great discus-thrower in the sky is at it again. Use that old technique of firing down the left hand edge. | ||
| ZONE 3 | Roll out the barrel - or rather blast them onto the next screen where they'll come in useful. | ||
| ZONE 2 | See what I mean! The best tactic here is to push the right hand barrel
up the right edge and fire it diagonally towards the top of the screen
to block two or three of the mines. You'll need more barrels to form road blocks here, so nip into Zone 1 and bring them back here. | ||
| ZONE 1 | The end's in sight. Take a quick butchers then bomb off back up the road
to collect the Lasertron. First things first - take care of the discs before doing anything else. And don't forget to take the barrels back to the previous zone. | ||
| ZONE 0 | Made it! Just get the Lasertron on the square and it's all over for the
alien invaders. Now you can see just how dumb these one-eyed devils really are. They line up and form a guard of honour as the Lasertron goes on its deadly mission. The alien spaceship just doesn't stand a chance. But the aliens have one last trick up their sleeve - as soon as the ship's disintegrated, you'll find yourself right back at Zone 30 for another go. The only difference is that this time the enemy's even faster and much, much meaner. | ||
| Home | Contents | KwikPik |