Preface.
This course in learning Java is not intended for absolute beginners. Some prior knowledge of Java is assumed, at the level of the course at Free-Ed written by Rogers Cadenhead, which is where I first learned Java myself. Readers who have as yet no knowledge of Java are referred to Free-Ed and the course catalogue there. Since studying the Free-Ed course I have learned a little more of Java, chiefly from the AWT Fundamentals Short Course by jGuru at the Sun Java website and by searching around on the Sun Java website. My particular interests are free to the end user distance education and computer graphics and so I have tended to study aspects of Java that support those interests. I have developed some techniques of my own, for example the obeycode method that will be introduced, that I have found effective. Gathered together, some of the matters that I have learned may be of interest to other people learning Java and so I have produced this course.
The course will hopefully be self explanatory, but I do feel that the availability of tutor support is important lest someone get stuck and cannot work out how to proceed. This will be provided free of charge while resources permit. For the avoidance of doubt, this does not imply that a charge will be applied in some circumstance, for this course is itself free to the end user distance education. Rather, any tutorial support supplied will be free, yet I cannot make an open ended commitment to support a huge number of enquiries should that situation arise. So, while there are a few tutorial enquiries, which is the likely situation, I will do my best to respond. Please email any tutorial enquiries to William Overington and place the words JAVA COURSE in capital letters at the start of the subject line.
This course does not lead to a qualification or a credit award. This is not as I would wish it, for qualifications are important. However, the issues of qualifications for free to the end user distance education are huge. So the course stands alone, without any award of academic credit for its completion.
This course is prepared using Internet Explorer 5 on a PC to develop and test the software. All of the screen illustrations are from this environment. They may look different in other environments. The compiler used is the Sun Java Development Kit version 1.3 from the Sun Java website. Testing of the results has not taken place by me on any other platform. Readers who try these examples on other computers and with other browsers are invited to send me feedback as to cases where everything is fine or where there are any problems.
Introduction.
This course is on using computer graphics using the Abstract Windowing Toolkit
(often known by the initials AWT) within applets.
To begin, first please set up an HTML file named, say, Applet1.htm containing the
following text.
The width is set at 500 pixels and the height at 300 pixels.
When I am designing applets I have often used a width of 700 pixels and a height of 400 pixels.
I am here using the width of 500 pixels and the height of 300 pixels in case any students are
using equipment that has a lesser screen resolution.
Secondly, please set up the file Applet1.java containing the following code.
Compile the code using
thereby producing the file Applet1.class as a result.
Now run the file Applet1.htm and observe the result.
The result of this on the system used to prepare this course is just a grey filled rectangle,
exactly the same as if the Applet1.class file did not exist.
So let us make a first modification to the program and add in the line
within the init function.
The whole program is now as follows.
Please compile the code and run the HTML file again.
Now we have a yellow filled rectangle, so we know that Applet1.class is having an effect.
The obeycode technique.
In order to have the facility of being able to draw graphics in response to events such as clicking on buttons, clicking on checkboxes and adjusting scrollbars and so on, I have
devised a way of setting out programs for the purpose.
This is that there is a global int variable called obeycode with an initial value of 1.
All processing of response to events is organized so that the event handler function for the
most part simply alters the value of obeycode and then carries out the repaint function,
with most of the rest of the software to process that response being placed in the paint
function, being obeyed when obeycode has the required value.
Each button, checkbox and scrollbar and so on then has a value of obeycode assigned to it.
Indeed, sometimes a checkbox has two values of obeycode assigned to it, one for when the
box becomes checked and one for when it becomes unchecked.
At start up the paint function obeys the software specified for obeycode having a value of 1.
I have found this technique to be very effective.
Components on the screen.
With some components on the screen it is possible to decide whether to make the component
generate events or just be passive.
With a button, the button needs to be active.
With a checkbox, the checkbox may be active or passive.
Setting out components on the screen.
If one simply sets out a few buttons on a screen without specifying a layout manager, then
the system decides where to place them.
However, a layout manager is being used by default, namely the flow layout manager.
In producing graphics programs it is helpful to be able to specify the place where one would
like components to appear and to specify their size.
If one is using just one or two buttons then it is not a great problem if the buttons both
appear in a central position at the top of the screen.
However, using several buttons and checkboxes and textboxes starts to produce a somewhat
jumbled result.
When using scrollbars, the default size is not very suitable as it is, using
Internet Explorer 5, small.
However, elegant customized layouts can be produced if the flow layout manager is deselected,
bounds are set and the location and size of each component is specified in the init function.
One needs to use the commands
once.
One then needs to use commands such as
to state the x and y coordinates of the location of the top left corner of the button
on the screen and to state the width and height of the button itself, as well as the
command.
The first thing to do when having buttons and other active components in a Java program is
to add the line of software
In addition the line at the top of the program containing the word extends needs to have
added to it the word implements and the name or names of one or more listeners, using
a comma to separate them one from another if there are more than one in use.
If one is using one or more buttons in the program and one wishes to
have it or them react to an event one needs to include the word
ActionListener after the word implements.
Each button needs to have an action listener added to it.
One also needs to have a function called actionPerformed(ActionEvent event) defined.
This function is called whenever any one of the buttons is clicked.
Thus if there is more than one button, the actionPerformed function should provide
separate routes within the software for each of them.
If one is using one or more checkboxes in the program and one wishes to
have it or them react to an event one needs to include the word ItemListener
after the word implements.
It is quite possible to have checkboxes that have their values read when desired yet do
not actively initiate a response from the software other than ticking or unticking the
checkbox when it is clicked.
This is a choice open to the programmer in designing his or her software.
Please note that checkboxes may be grouped together, so that only one of the group
may be true at any one time.
These grouped checkboxes are displayed as round radio buttons by Internet Explorer 5.
Each checkbox that one needs to respond to being clicked needs to have an
item listener added to it.
One also needs to have a function called itemStateChanged(ItemEvent event) defined.
This function is called whenever any one of the checkboxes which has a listener is clicked.
Thus if there is more than one checkbox, the actionPerformed function should provide
separate routes within the software for each of them.
If one is using one or more scrollbars in the program and one wishes to
have it or them react to an event one needs to include
the word AdjustmentListener after the word implements.
Each scrollbar needs to have an adjustment listener added to it.
One also needs to have a function called adjustmentValueChanged(AdjustmentEvent event) defined.
Thus if there is more than one scrollbar, the adjustmentValueChanged function should provide
separate routes within the software for each of them.
If one is using one or more text fields in the program and one wishes to
have it or them react to an event one needs to include
the word TextListener after the word implements.
Each text field needs to have a text listener added to it.
One also needs to have a function called textValueChanged(TextEvent event)
defined.
Thus if there is more than one text field, the textValueChanged function should provide
separate routes within the software for each of them.
Please know that some of these listeners can be used for more than one type of screen
component.
Other components will be added later in this course.
At the present time, the intention is to convey the basic methods and show how
to get started rather than to supply a comprehensive list of facilities that
are available.
Random numbers.
In designing this course where students will have a variety of backgrounds, it is
important to convey the desired information without causing confusion.
Thus although some readers will have a background of mathematics and might relate
well to graphics examples based on mathematical functions, others might find such
an approach confusing, wishing to perhaps apply Java to matters such as text processing
or question and multichoice answer programs.
I have therefore decided to keep this course as free of mathematical functions and of
text processing matters as much as possible in order to better facilitate the learning
of the matters around which this course centres, namely producing Java applets where
buttons, scrollbars, checkboxes and textboxes are set onto a screen in a precise manner
and applied in conjunction with graphics.
Accordingly, I here introduce a short section on random numbers which will hopefully be
straightforward for programmers from all backgrounds in the hope that their use will
facilitate the learning of the core matters of this course.
The function Math.random() will generate a random number which is greater than or equal
to zero and less than 1.
There are certain applications of random numbers where these random numbers are not
sufficiently random and there are branches of mathematics concerned with such matters
as to how random is a given method of generating random numbers.
However, for our purposes here the function provided is entirely suitable.
For example, we will use random numbers so that when a button is clicked the coordinates
of two random points in an area are generated so that a line may be drawn that joins them
together.
The advantage of using random numbers in such a demonstration program is that every click
of the button will, apart from very small chance occurrences, produce a different pair
of points and thus one may observe the response to clicking the button a number of times.
Let us take our Applet1 program and add a few lines so as to add one button and make it
join two random points together.
Previously we had the following.
Let us now make some additions to produce the following.
Let us decide to have an area 220 pixels wide by 220 pixels high within which to draw.
This will be centred on the screen of the applet.
This choice of size is a design decision.
In order to have a border of 20 pixels top and bottom, the maximum size would be 260
pixels high.
This is because 260 is 300 minus twice 20.
The choice of a 20 pixel border is just for aesthetic reasons.
Given the choice of a 20 pixel border does later lead to a button being defined with
a width of 100 pixels.
Yet a larger display area would mean a smaller button.
It is all a matter of judging what looks best in the opinion of the designer consistent
with displaying the desired results.
It can be useful to make a sketch using a pen and paper when designing the layout of
a graphics display.
One can learn by experience to get a feel for graphic design.
So the centre is at 250 pixels in the x direction and 150 pixels down from the top of the
screen.
So the top left corner of the drawing area will be at coordinates (x = 140, y = 40).
For the x coordinate this is because 140 is 250 - 110 and for the y coordinate this is
because 40 is 150 - 110.
The values of 110 are obtained because 110 is half of 220 and half of the display area is on
each side of the centre of the screen of the applet.
Remembering that y values are measured down the screen.
Firstly we add
Next we add
Now add in obeycode with an initial value of 1 and xzero and yzero with values of 140 and 40
as those are the top left corner of the display area.
Please note that here we are using the coordinates of the top left corner of the display area.
This is because we are dealing with only positive numbers in the data upon which the display
is based and it is not a scientific application.
For some applications we might choose the centre of the display area as the location of the
origin point of the display area.
In some other applications, particularly scientific graphs, we might choose the bottom left
corner of the display area as the location of the origin point of the display area.
Now turn off the default layout and set bounds.
Now define a button as follows.
Now add an action listener, set the location and the size and add the button to the screen.
Now add the actionPerformed function.
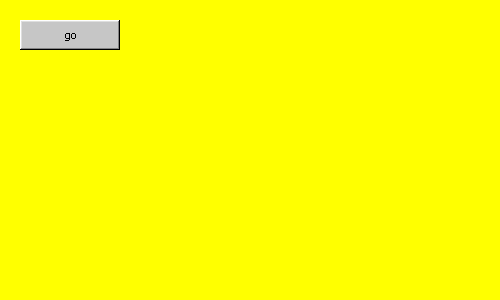
The one button program just after start up.
It now remains to add some software into the paint function so that when the
button is clicked, something happens as a demonstration that it has been
clicked.
This demonstration generates four random numbers in the range from 0 to just less
than 220 and uses the whole number parts of them to produce the coordinates (x1,y1)
and (x2,y2) within the display area selected.
The advantage of this as demonstration software is that, apart from very small chance
occurrences, a different line is produced every time that the button is clicked so
that the display is different after each click of the button.
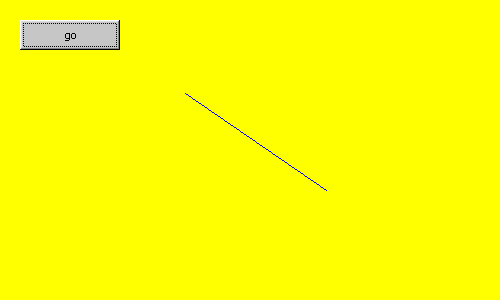
The one button program after one click on the button.
The line is random and a different run will extremely likely produce a different result.
For completeness, an enhanced version of the program is here presented showing how the
program may be adapted to add a second button.
This second button makes random lines be drawn in red.
Please note which instructions are added for the second button, essentially being
duplications of previous instructions with slight alterations so that the second
button has a different name and is located in a different place and which instructions
do not need to be duplicated.
The displayed text of the first button has also been altered.
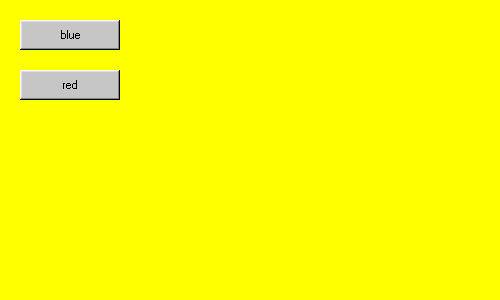
The two button program just after start up.
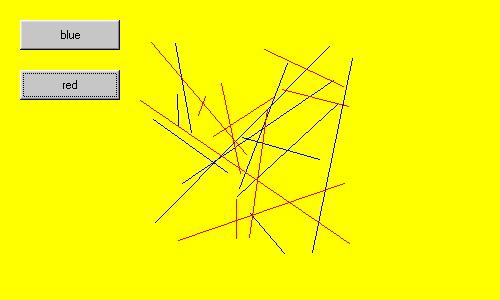
The two button program after ten clicks on the blue button and then ten clicks
on the red button.
The lines are random and a different run will extremely likely produce a different result.
Having thus produced a program with two buttons that are precisely located and sized that
produces graphic output, the second part of this course will deal with scrollbars.
Java and Distance Education index page.
Java and Distance Education
Copyright 2000 William Overington
<html>
<head>
</head>
<body bgcolor="#808000">
<p align=center>
<applet code="Applet1.class" width=500 height=300>
</applet>
</body>
</html>
import java.awt.*;

public class Applet1 extends java.applet.Applet
  {

    public void init()
      {
      }

    public void paint(Graphics screen)
      {
      }

    public void update(Graphics screen)
      {
        paint(screen);
      }

  }
javac Applet1.java
setBackground(Color.yellow);
import java.awt.*;

public class Applet1 extends java.applet.Applet
  {

    public void init()
      {
        setBackground(Color.yellow);
      }

    public void paint(Graphics screen)
      {
      }

    public void update(Graphics screen)
      {
        paint(screen);
      }

  }
setLayout(null);
setBounds(0,0,500,300);
button51.setLocation(20,20);
button51.setSize(100,30);
add(button51);
import java.awt.event.*;
at the top of the program, so that all of the event handlers can be known to the program
if they are needed.
import java.awt.*;

public class Applet1 extends java.applet.Applet
  {

    public void init()
      {
        setBackground(Color.yellow);
      }

    public void paint(Graphics screen)
      {
      }

    public void update(Graphics screen)
      {
        paint(screen);
      }

  }
import java.awt.*;
import java.awt.event.*;

public class Applet1 extends java.applet.Applet
                             implements ActionListener
  {
    int obeycode = 1;
    int xzero = 140;
    int yzero = 40;
    Button button51 = new Button("go");

    public void init()
      {
        setBackground(Color.yellow);
        setLayout(null);
        setBounds(0,0,500,300);
        button51.addActionListener(this);
        button51.setLocation(20,20);
        button51.setSize(100,30);
        add(button51);
      }

    public void actionPerformed(ActionEvent event)
      {
        Object source = event.getSource();
        if (source == button51)
          {
            obeycode=51;
          }
        repaint();
      }

    public void paint(Graphics screen)
      {
        if (obeycode == 51)
          {
            double d1,d2,d3,d4;
            int x1,y1,x2,y2;
            d1=220.0*Math.random();
            x1=(int)d1;
            d2=220.0*Math.random();
            y1=(int)d2;
            d3=220.0*Math.random();
            x2=(int)d3;
            d4=220.0*Math.random();
            y2=(int)d4;
            screen.setColor(Color.blue);
            screen.drawLine(xzero+x1,yzero+y1,xzero+x2,yzero+y2);
          }
      }

    public void update(Graphics screen)
      {
        paint(screen);
      }

  }
import java.awt.event.*;
implements ActionListener
int obeycode = 1;
int xzero = 140;
int yzero = 40;
setLayout(null);
setBounds(0,0,500,300);
Button button51 = new Button("go");
button51.addActionListener(this);
button51.setLocation(20,20);
button51.setSize=(100,30);
add(button51);
    public void actionPerformed(ActionEvent event)
      {
        Object source = event.getSource();
        if (source == button51)
          {
            obeycode=51;
          }
        repaint();
      }
        if (obeycode == 51)
          {
            double d1,d2,d3,d4;
            int x1,y1,x2,y2;
            d1=220.0*Math.random();
            x1=(int)d1;
            d2=220.0*Math.random();
            y1=(int)d2;
            d3=220.0*Math.random();
            x2=(int)d3;
            d4=220.0*Math.random();
            y2=(int)d4;
            screen.setColor(Color.blue);
            screen.drawLine(xzero+x1,yzero+y1,xzero+x2,yzero+y2);
          }
import java.awt.*;
import java.awt.event.*;

public class Applet1 extends java.applet.Applet
                             implements ActionListener
  {
    int obeycode = 1;
    int xzero = 140;
    int yzero = 40;
    Button button51 = new Button("blue");
    Button button52 = new Button("red");

    public void init()
      {
        setBackground(Color.yellow);
        setLayout(null);
        setBounds(0,0,500,300);
        button51.addActionListener(this);
        button51.setLocation(20,20);
        button51.setSize(100,30);
        add(button51);
        button52.addActionListener(this);
        button52.setLocation(20,70);
        button52.setSize(100,30);
        add(button52);
      }

    public void actionPerformed(ActionEvent event)
      {
        Object source = event.getSource();
        if (source == button51)
          {
            obeycode=51;
          }
        if (source == button52)
          {
            obeycode=52;
          }
        repaint();
      }

    public void paint(Graphics screen)
      {
        if ((obeycode == 51) | (obeycode == 52))
          // The | symbol means OR
          {
            double d1,d2,d3,d4;
            int x1,y1,x2,y2;
            d1=220.0*Math.random();
            x1=(int)d1;
            d2=220.0*Math.random();
            y1=(int)d2;
            d3=220.0*Math.random();
            x2=(int)d3;
            d4=220.0*Math.random();
            y2=(int)d4;
            if (obeycode == 51)
              {
                screen.setColor(Color.blue);
              }
            if (obeycode == 52)
              {
                screen.setColor(Color.red);
              }
            screen.drawLine(xzero+x1,yzero+y1,xzero+x2,yzero+y2);
          }
      }

    public void update(Graphics screen)
      {
        paint(screen);
      }

  }