Scrollbars.
Scrollbars are a delight to add to an applet.
First let us take a copy of the final program of section 1 and take out a lot of it
so as to leave only those parts that will be of use for this second example and then
add in some additional software.
Please note that the name of the class has been changed so that this program will
need to be saved in a file with Applet2.java as its name.
Although there are a number of changes the overall structure of the program is
much the same.
Please note particularly that we no longer have an actionPerformed function and
that we now have an adjustmentValueChanged function.
If we were to have both buttons and scrollbars on in one applet then we would
have both an actionPerformed function and an adjustmentValueChanged function
in the software.
We have two scrollbars in this program, one placed horizontally and one placed
vertically.
Whether a scrollbar is horizontal or vertical does not affect the software of
how it is used, only how it is set up.
import java.awt.*;
import java.awt.event.*;

public class Applet2 extends java.applet.Applet
                             implements AdjustmentListener
  {
    int obeycode = 1;
    int xzero = 150;
    int yzero = 40;
    int value81 = 0;
    int value82 = 0;
    int oldvalue81 = 0;
    int oldvalue82 = 0;
    Scrollbar s1 = new Scrollbar(Scrollbar.HORIZONTAL,0,5,0,205);
    Scrollbar s2 = new Scrollbar(Scrollbar.VERTICAL,0,5,0,205);
//  The scrollbars have five parameters, namely the orientation,
//  the initial value, the width of the handle, the minimum value
//  and the maximum value plus the width of the slider.

    public void init()
      {
        setBackground(Color.magenta);
        setLayout(null);
        setBounds(0,0,500,300);
        s1.addAdjustmentListener(this);
        s1.setLocation(130,260);
        s1.setSize(240,20);
        add(s1);
        s2.addAdjustmentListener(this);
        s2.setLocation(50,20);
        s2.setSize(20,240);
        add(s2);
      }

    public void adjustmentValueChanged(AdjustmentEvent adjustevent)
      {
        Object source = adjustevent.getSource();

        if (source == s1)
          {
            obeycode=81;
            value81=adjustevent.getValue();
          }

        if (source == s2)
          {
            obeycode=82;
            value82=adjustevent.getValue();
          }
            repaint();
      }

    public void paint(Graphics screen)
      {
        if (obeycode == 1)
          {
            double d1,d2;
            int x1,y1;
            screen.setColor(Color.cyan);
            for(int i=1;i<=5;i++)
              {
                d1=160.0*Math.random();
                x1=(int)d1;
                d2=160.0*Math.random();
                y1=(int)d2;
                screen.fillOval(xzero+x1,yzero+y1,40,40);
             }
          }
        if ((obeycode == 81) | (obeycode == 82))
          {
            screen.setColor(Color.white);
            screen.drawLine(xzero+oldvalue81,yzero+oldvalue82,
                                    xzero+value81,yzero+value82);
            oldvalue81=value81;
            oldvalue82=value82;
          }
      }

    public void update(Graphics screen)
      {
        paint(screen);
      }

  }
|
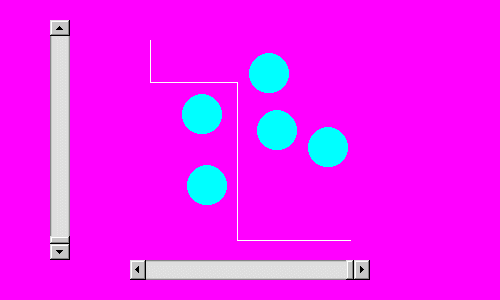
The program at start up. As the discs are placed in random positions it is extremely likely that a rerun of the program will have the discs in different positions. |
Let us look at how the various numerical values were chosen.
It was decided that the overall look of the applet would be to have a square display
area in the centre upon which would be placed five filled circles, which may also
be called discs, placed at random at the start of the particular run of the applet
and remaining in a fixed position during the run of the applet, possibly overlapping
possibly not depending upon how the random numbers appear.
Along the bottom of the applet would be a horizontal scroll bar and up the left hand
side would be a vertical scroll bar.
Upon a scrollbar being moved, a line would be drawn to the new point within the square
display area indicated by the coordinates of the horizontal scrollbar and the vertical
scrollbar taken together.
Thus when the program is running by moving first one scrollbar and then the other
scrollbar time after time, a path may be drawn on the screen.
One may perhaps have an objective of drawing a line from the top left of the square
display area to the bottom right of the square display area without touching the filled
circles.
Or, if this becomes too simple, perhaps drawing a line from the top left of the
square display area to the bottom right of the square display area such that two
discs are on one side of the line and three discs are on the other side of the
line.
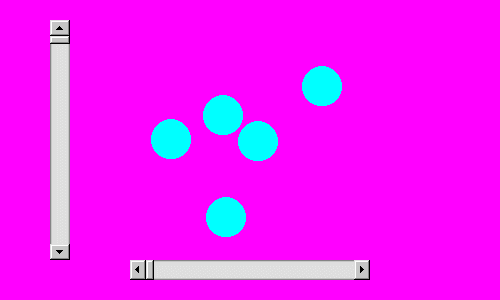
A line drawn between the discs using both scrollbars alternately.
Please note the difference in the positions of the sliders on the scrollbars compared
with the positions of the sliders on the scrollbars in the previous illustration.
This might not always be possible depending upon where the discs are located, but a
few attempts should give good experience of experiencing how scrollbars may be used.
It can be useful to make a sketch using a pen and paper when designing the layout of
a graphics display.
Let us suppose that with the applet area being 500 pixels wide by 300 pixels high
that we will have a square display area 200 pixels square centred on the point 250
pixels horizontally from the left edge and so many pixels down from the top.
But how many?
The 250 pixels horizontally is half way across the applet.
The number of pixels down needs to be chosen so that there is space below the square
display area to place the horizontal scrollbar.
This means that xzero is 150 (that is, 250 - 100) and yzero is yet to be
determined, but is 100 less than whatever is chosen for the number of pixels down the
screen to place the centre of the square display area.
Now let us make the choice that the discs will be 40 pixels in diameter.
This means that the random numbers for the locations of the discs must be within the
range 0 to 159 so that when the discs are drawn, they will always be within the
square display area.
In addition they need to be drawn offset by xzero and yzero so that they are always
within the desired square display area and not at the top left corner of the applet
display area.
Turning now to the positioning of the two scroll bars, let us choose to make them each
20 pixels wide.
Now as to their length, it would be nice to arrange the scrollbars such that the
intersection of two abstract lines drawn through the two sliders and perpendicular
to their respective scrollbars is the point where the line in the square display area
is being drawn.
Remember, however, that this is an abstract windowing toolkit and whereas it may be possible
to get a good looking result with one system, such as the Internet Explorer 5 system
being used to develop this course, it may not appear the same with another system if
the applet is placed on the world wide web.
However, what can be done?
It is certainly possible to make the scrollbars to be a little longer than the side of the
square display area and to make their long axes be centred on the centres of the sides of
the square display area, so that even if the alignment is not exact, it will give a
reasonable impression of what one is trying to achieve.
Please bear in mind that a feedback loop of the user, the mouse and the line on the screen
will exist and so perhaps the impression might be better than the mechanical accuracy of
the alignment.
So let us choose 240 pixels of length for the scrollbars.
This is because 240 is 200, the length of the side of the square display area, plus 20,
the width of the scrollbar, added at each end.
That is, a first approximation of active length plus a square end section at each end.
Let us also choose to have a margin of 20 pixels at the top and bottom of the applet
display area.
This can all fit together quite nicely if one places the centre of the square display area
140 pixels down from the top.
This makes yzero have a value of 40.
The bottom of the square display area is 239 pixels down and so placing the centre of the
horizontal scroll bar 270 pixels down means that, as it is 20 pixels wide, a reasonable
display can be achieved.
The horizontal scrollbar needs to be centred at 250 pixels horizontal.
It will be 20 pixels wide, so a halfwidth is 10 pixels.
So the horizontal scrollbar is centred at (250,270) from the top left corner.
The top left corner of the horizontal scrollbar is thus at (130,260) where 130 is
250 - (240/2) and 260 is 270 - 10.
The horizontal scrollbar has a width of 240 pixels and a height of 20 pixels.
The vertical scrollbar needs to have the horizontal position of its top left location
such that it does not hit or get too close for aesthetic look to the horizontal
scrollbar.
The horizontal scrollbar has a minimum horizontal coordinate of 130, so allowing 20 pixels
for the width of the vertical scrollbar and allowing another 20 pixels so as to give a good
clearance between the two scrollbars, this means that the horizontal value for the top left
corner location of the vertical scrollbar must not be greater than 90,
where 90 is 130 - 20 - 20.
Let us choose to make it 50 so as to give a good space between the two scrollbars.
The vertical scrollbar needs to be centred at 140 pixels down, so its top is at 20 pixels
down, as 20 is 140 - (240/2).
The vertical scrollbar is 20 pixels wide and 240 pixels in height.
I did not reach this design entirely as smoothly as might appear from the above.
I initially tried having the square display area slightly higher on the applet display,
then found that the vertical scrollbar was almost touching the top edge, so I
redesigned it and it came out as it is now.
Achieving a good result for graphics can often be a combination of calculating positions
and sizing coupled with trying it out and redesigning.
The program can be compiled using the command below.
The program can be run using an HTML file Applet2.htm containing the following commands.
When the applet is running, please try dragging the slider part of the scroll bar,
clicking on each of the two ends of the scrollbars and clicking in the spaces between
the slider and the ends.
When clicking in the spaces between the slider and the ends in order to observe what
happens, it is useful to try doing the clicking alternating between the horizontal
scrollbar and the vertical scrollbar.
This produces white lines at right angles to each other and so the size of the effect
can be readily observed.
Also, please try pressing the mouse button down on the end of one of the two scrollbars
and keeping it pressed down.
Please observe the progress of the line on the screen.
Java and Distance Education index page.
Java and Distance Education
Copyright 2000 William Overington

javac Applet2.java
<html>
<head>
</head>
<body bgcolor="#808000">
<p align=center>
<applet code="Applet2.class" width=500 height=300>
</applet>
</body>
</html>
