Wednesday 29 May 2002
Together with a supplementary note of Thursday 30 May 2002
This art workshop does not set out to teach you how to draw, or how to be an artist.
This art workshop does not set out to teach you the basics of using the Microsoft Paint program.
This art workshop does not set out to teach you how to get your art into a final ready to
broadcast file format, though it does mention what needs to be done, though those things need
not necessarily be done by you.
It is also only fair to mention that, at the time of writing, there is no direct route to get
your art broadcast, yet, as time goes on, that might possibly change, if one or more
DVB-MHP broadcasters decide to broadcast original art.
So, what does this art workshop do?
Well, it provides details of a technique which I have devised which will help anyone interested
in producing original artwork intended for broadcasting upon DVB-MHP broadcasting channels
to produce artwork using only colours from the palette of 139 opaque colours which are
mandatorily available for display on a minimum DVB-MHP television set.
So, if you produce a picture using this technique, which requires no specialist knowledge
of television technology or colour measurement technology to use, then the artwork which
you produce will automatically be produced using just colours selected from that set of
139 opaque colours.
So, artwork produced using this technique will be ready to go, no one raising eyebrows
about saying that it is a nice picture but unfortunately the colours are not from the
set of 139 opaque colours so there will be colour distortion when viewed on a minimum
DVB-MHP television.
A few short paragraphs about the DVB-MHP system.
Thank you for visiting this art workshop.
Visitors could arrive here from various routes.
Some visitors could be broadcasting engineers, working on the DVB-MHP system.
Some visitors could be artists, interested in producing art for a potential new media outlet.
Some visitors could have just wandered into this art workshop serendipitously because they
happened to be visiting this webspace regarding a completely different topic.
So, to avoid a long introduction about the DVB-MHP system, perhaps I might just say that DVB-MHP means Digital Video Broadcasting - Multimedia Home Platform and that there are other documents about the DVB-MHP system within this webspace and one set of documents has an index page
with several hyperlinks to websites about the DVB-MHP system.
A short overview is that DVB-MHP is about broadcasting Java programs and multimedia graphics files and so on in some of the spare space within digital television channels so that they can be used in television sets which have suitable multimedia facilities available, either built into the television or in a set top box.
Now, back to the art!
The first thing to note is that I fully recognise that some people reading this art workshop
might have access to superb computing facilities which they can use any time they choose to
do so, yet I also recognise that some people may be reading this in a public library
or an open access area in a college or in an internet café or a similar sort of location
where the facilities may be more general.
However, even a location with only the most general facilities available on a PC might well
have the Microsoft Paint program available.
I like the Paint program.
It is widely available and has many features which can be used to good effect.
It seems ideal as a software package to use in trying to teach on the web, simply because
of the combination of wide availability and its many useful features.
So, this workshop has been carefully designed so that as many people as possible can hopefully
enjoy reading through it and hopefully learning from it and be able to produce some artwork
of their own if they so wish.
You need access to the Microsoft Paint program.
Ideally a fairly recent version which can read in a .gif format file, although this is not
absolutely necessary as there is a way round that if only an older version of
the Paint program is available.
Fortunately the Paint program is often (always?) bundled in with the Windows system for a PC,
so, if you are using a PC with Windows on it, there is probably a very good chance that the
PC has the Paint program available on it.
You also need access to a display which is in 24 bit true colour mode.
Most PCs tend to have this capability these days, though it is possible that the monitor might
have been set up with a different colour setting.
This art workshop was prepared on a system using a 800 pixel wide by 600 pixel high screen display.
Ideally, you will be able to save your files onto a hard disc.
However, I am aware that some visitors might not have the opportunity to save to a hard disc,
so the matter of whether a floppy disc can be used has been considered.
|
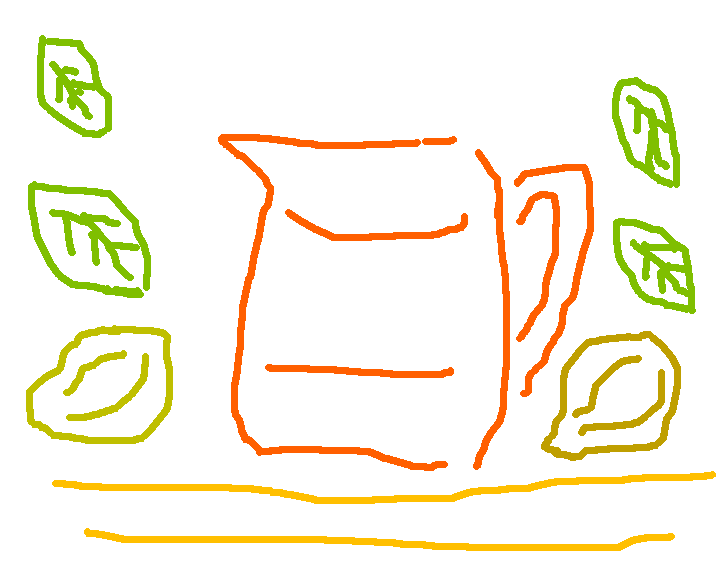
Picture produced on a floppy disc.
Displayed at half size.
This is a .gif file, as some browsers will not show a .png file properly.
Here is a link to the .png file.
art07001.png
Apart from the matter that the pHYs chunk has not been set, as I do not have the facilities to do so, the picture is ready for broadcasting on a DVB-MHP channel.
|
Well, I have tested out this workshop using just a floppy disc for storing the files.
It can be done.
A 1.4 Megabyte floppy disc is needed.
The only problems are that the picture file which is produced is 1297 kilobytes in size so
it takes up most of the space on a floppy disc, and that the file which is actually in use
when someone is drawing is larger than the capacity of a floppy disc, so the file in use during
the actual drawing process cannot be saved to a floppy disc.
There is however a way round this, which will be mentioned as the workshop proceeds.
The first thing that you need to do is to find out whether the version of Paint that
you intend to use can load a .gif file.
If it can then please go to the following web page and when there save to your local disc
a copy of the file art02001.gif for which there is a link in that web page.
http://www.users.globalnet.co.uk/~ngo/art02000.htm
You can do that now if you wish.
It only needs doing once, no matter how many pictures you eventually produce.
The next thing that you need to do is to produce a .bmp version of that file.
If you are using a version of Paint which has the facility of loading a .gif file into it,
simply start the Paint program, open the art02001.gif file from your disc storage, then use File Save As... and choose 24-bit Bitmap and save the file as a .bmp file, using a filename such as
picture.bmp or whatever you choose, then close the Paint program so that there is no possibility
that when you start painting that the Paint program has some idea that you started with a
.gif file.
If you are using a version of Paint which has not got facilities to read in a .gif file then you need to download a .bmp file which I have specially prepared for the purpose.
It is not a .bmp version of the art02001.gif file as that would be over a megabyte and would
take a long time to download.
It is a file which is about 34 kilobytes in size.
It is a .bmp file which is 47 pixels wide by 237 pixels high.
It has colours.bmp as its file name.
The consequence of this small size is that the colour areas are only 3 pixels wide by
5 pixels high, though they can be viewed at 8x magnification if desired.
http://www.users.globalnet.co.uk/~ngo/colours.bmp
The use of the colours.bmp file can also be advantageous if you want to be able to take away a
partially completed piece of artwork on a floppy disc, as colours.bmp has been made small enough
that, using it, a partially completed file can fit onto a floppy disc, while also keeping
a separate copy of colours.bmp on the disc as well.
A finished file is 1216 kilobytes, an unfinished file started using colours.bmp is
1297 kilobytes.
The colours.bmp file is 34 kilobytes.
There is still 93.5 kilobytes of space free on a floppy disc as well.
If you use the colours.bmp file, start up the Paint program, load it in and then use
File Save As... and choose 24-bit Bitmap and save the file as a .bmp file, using a filename
such as picture.bmp or whatever you choose, then close the Paint program.
Now you are ready to start producing your picture, whichever route you used to obtain a
file named picture.bmp on your disc and whether the disc is a hard disc or a floppy disc.
Start the Paint program and open the file picture.bmp or whatever you called it.
Use Image Attributes... to set the height of the picture.
Set it to 576 pixels if it is not already at that figure and click OK.
If the picture is derived from colours.bmp and now has a large white area at the base of the
picture, it is convenient, though not essential, to fill that area with black colour.
Use Image Flip/Rotate... to flip the image horizontally.
Use Image Attributes... to set the size of the picture.
If you derived your picture from art02001.gif set the width to 1488 pixels, that is, the
768 pixels of the art02001.gif file plus the 720 pixels of the artwork you are about to produce.
If you derived your picture from colours.bmp set the width to 767 pixels, that is, the
47 pixels of the colours.bmp file plus the 720 pixels of the artwork you are about to produce.
In either case, the height needs to be 576 pixels.
Now, use Image Flip/Rotate... to flip the image horizontally again, so that you end up with
a long image with plain white workspace at the left and an area with 139 colours at the right.
When, later on, you have finished producing your artwork, you will need to use
Image Attributes... to set the width of the image to 720 pixels, which will automatically
throw away the area with the 139 colours as it will not be needed within your picture.
Once the picture is adjusted to the correct size, then it can be saved in its permanent form.
Now, the key thing to remember about this technique is that when selecting colours for drawing,
do not select any drawing colour or background colour using the usual technique of clicking
in the colour box.
A few of the colours in the colour box are the same as the ones you are to use,
but many are not.
It is important not to use those colours in the colour box that Paint provides which are not
colours from within the set of 139 opaque colours that are detailed in the
DVB-MHP specification.
In passing I mention, for completeness, that the DVB-MHP specification also allows certain
semi-transparent colours, but as Paint cannot support transparency those colours are not
referred to in this art workshop other than in this passing note.
So, I shall now explain how to select colours.
In Paint, click on the Pick Color tool, which is the third tool down in the left hand column
of the tool box.
Now, find the colour of your choice from within the picture, and click on that colour area.
You can use a left click for foreground colour and a right click for background colour.
Notice how the chosen colour is shown in one of the squares at the left hand end of the
Paint program's colour box.
The Paint program will bounce out of the Pick Color tool and end up somewhere else.
Now, choose whichever tool you want to use if it is not the one into which Paint has bounced.
Just before you start drawing you need to know one more point.
On a PC, each pixel in a picture is square.
On the DVB-MHP system, in a minimum system the pixels of the display will not be square.
Each pixel is a rectangular shape, in an aspect ratio of 16 wide to 15 high.
This need not be any great problem for you in producing some art, please just bear in mind
that if it ever does get broadcast, it will look a bit wider than it does on a PC.
This may not even be noticeable for some types of pictures, though for circles it will be
very noticeable.
If you do need a circle to appear, then you need to draw it as an ellipse that is narrower
from side to side than it is from top to bottom, so that when it is stretched it should
look correct.
By all means, as a learning exercise, try to use circles if you wish for your second
picture or for a subsequent picture if you fancy having a go.
However, it is perhaps best to avoid circles if you are producing just one picture,
or if a broadcaster invites people to send in just one picture for considration,
unless, of course, the broadcaster stipulates in the project brief that a circle should
be included.
Start of supplementary note of Thursday 30 May 2002.
Having uploaded the workshop files to the web during the early evening of 29 May 2002,
it was early on 30 May 2002, whilst thinking of how hopefully the workshop would be helpful
in increasing interest in art in relation to the DVB-MHP platform and wondering if perhaps
my .png file included in the workshop would be broadcast, that I remembered that I had,
whilst concentrating on the matter of the colours, forgotten the matter of the size of
the image.
Not just forgotten to mention it to readers, but also forgotten to remember it while I
was producing the picture which I included in the workshop!
So, I looked up the information and then applied it to a copy of my picture.
In the event my picture above, "Picture produced on a floppy disc." could have hardly been
better constructed had I deliberately set out to produce a picture which would demonstrate
the matter which I am now about to explain!
For reasons to do with compatibility with analogue televisions, of which field I know little,
so I cannot say more, the nine pixels at each edge may not even reach the screen at all.
Then there is an allowance of a further 5% at the left and right edges together with an
allowance of 5% at the upper edge and the lower edge of the picture, where the television
screen may perhaps not show the picture.
Starting with pixel coordinates as (0,0) in the top left corner of the artwork,
with x going horizontally from left to right and y going vertically from top to bottom,
it appears that significant items in the picture should be within a box that has its upper left
corner at (43,28) and its lower right corner at (675,545).
There is also the matter that some displays on analogue televisions have rounded corners,
so that could cause further loss of picture area in the corners.
As it happens, my picture has the right hand edge of the upper horizontal line within the
nine pixel right edge margin and each of the leaves and the vegetables and the lower
horizontal line partly within the 5% edge.
The jug in the middle is unaffected.
So, the picture could, in fact, perhaps become quite a classic image to demonstrate how a
picture could be affected by the type of display being used and the way that the television
is adjusted.
So, the picture could perhaps be broadcast as a test picture so that engineers could observe
the display of the picture on a variety of television displays.
As fully digital television sets come onto the market, maybe the display of this picture would
improve.
In preparing your own artwork, I suggest that you fill the whole 720 pixels wide by 576
pixels high area, so that there is essentially background around the edges, so that the
effect looks pleasing whether there is a full display or whether there is edge clipping
of varying amounts.
Significant items could then be placed so as to avoid the edge areas where they might be
clipped.
End of supplementary note of Thursday 30 May 2002.
Produce your artwork according to your wishes using that colour until you wish to change colour.
You may change both foreground colour and background colour whenever you so choose.
A few extra points might be of interest.
When using the colours.bmp option, it is convenient to set magnification to 8x while selecting colours.
The picture in the art02001.gif is set out so as to give a three-dimensional view of a
colour space.
In the picture in the colours.bmp file, the top block of colours corresponds to the rear plane
of the three-dimensional display of the art02001.gif file, the middle block of colours
corresponds to the middle plane of the three-dimensional display of the art02001.gif file
and the lower block corresponds to the front plane of the the three-dimensional display
of the art2001.gif file.
The four additional grey colours are grouped together below in a line.
Readers who cannot load a copy of the art02001.gif file into Paint might nevertheless like
to save a copy of that file to local storage as it might be easier to make an artistic choice
of which colour to use from that diagram.
It might not be possible to load it into Paint, but it might be possible to look at
it using a browser.
|
Another possibility is that it might, if you are familiar with such things and the
Print Screen facility is available to you, to get the image of the art02001.gif file into
Paint by that means.
However, please be careful with that and check that the display being used is 24-bit
true colour, and that no dithering has occurred, as there is a possibility that the
colours might not be saved properly.
Checking by looking at the red, green and blue components of colours using the method
mentioned in the main text might be effective.
First use the colours.bmp file and find out what values the colours should have, then check
what colours the picture produced from the screen print actually has.
|
In order to find out what are the red, green, blue colour coordinates of a particular colour,
simply set it as the foreground colour, then use Colors Edit Colors... Define Custom Colors >> and then the information is there for you.
Use Cancel to leave.
As you are going to throw away this copy of the set of 139 colours when you have finished
producing your artwork, feel free to make a mark next to any particular colour area if you
wish so that you can easily go back to a previous colour if you wish, as many of the colours
look similar to other colours.
In order to have a clear look at the darker colours, try filling the background around
the colours with white.
This makes the darker colours more visible.
Once you have selected a colour, use Edit Undo so as to put the black background back.
The Edit Undo does not change the selected colour.
Avoid using the option that Paint provides to save as a .gif file.
It can distort the colours.
Well, avoid it for any purpose to do with broadcasting on the DVB-MHP system:
if you happen to produce a nice picture and want to use it on a web page, then the
gif saving routine in Paint could be used if the colour distortion produces acceptable
results.
However, if you do do that, please save your picture as a .bmp file first, because once
the colour distortion takes place in producing the .gif file, it won't undo!
I find Paint is marvellous for preparing illustrations but I save them as .bmp files
then convert them to .gif or .png format using Paint Shop Pro.
Your .bmp file needs to be converted to Portable Network Graphics format for broadcasting
using an Optimized Octree colour conversion routine.
This is available in some drawing packages, such as Paint Shop Pro.
In Paint Shop Pro the Optimized Octree method is not the default case, it will need
to be chosen.
It is best to keep your artwork in .bmp format unless you can get access to the correct
software, even then it is a good idea to keep a copy of the .bmp file too.
There is also the issue of section 15.1.1 of the DVB-MHP specification over adding a
correctly set pHYs chunk into a .png file in order for it to be compliant with the
specification.
It is best at this time to leave that to the broadcasters as software to set the pHYs
chunk is not, as far as I aware, widely available.
Finally, have fun with producing art that appeals to you.