 Go to the Archive
index
Go to the Archive
indexPeter Hill has sent me a copy of an article that originally appeared in Hobbies Weekly on May 21st 1952. Just the thing if you want authentic looking accessories on your cyclemotor.
An increasing number of bicycles are being converted into autocycles with the addition of small two-stroke engines of one kind or another. These engines are reliable and most economical to run, and are particularly useful to people (especially older folk) who must have some means of transport over a distance to and from work.
Once the initial outlay (between £20 and £30) for the engine has been met there is little further expense, and no time is lost in getting it fitted to the bicycle. However, there are one or two extra items which must be added before the machine can be taken out on the road. A driving licence must be taken out by the owner, and a road fund licence secured (both from the County Council), which means the fitting of registration number plates fore and aft of the machine. There must also be a road fund licence holder fitted - usually to the front wheel fork or axle. There is no reason why the average handyman should not make some of these fittings himself and thus save some of the expense in converting his bicycle into a light motor-bike.
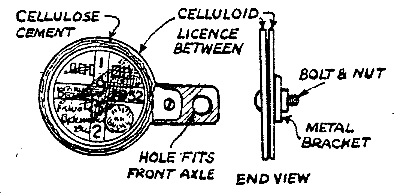
Fig.1 - Licence Holder
The licence holder is probably best purchased with the engine, at a cost of about 3/-, although it is possible to make a quite serviceable one from two discs of stiff celluloid slightly larger than the diameter of the licence outer circle. Fig. 1 shows how flanges are left on the celluloid which are bolted to a metal bracket which fits on the front axle. The licence is fixed between the celluloid pieces by running a very thin line of celluloid cement around the edges. Unless one has the materials on hand, of course, it is more economical to purchase the holder ready made.
The registration number plates can be fabricated at a total cost of about 1/- if the pieces of sheet metal can be found - on a scrap heap - or an old sheet iron advertisement plate from a shop-front might serve. Old 5 gallon oil drums (any tractor depot or garage may have some of these) are another source of supply for sheet metal of about the right thickness. Cut out two pieces about 10ins by 8ins and bring home for further work.
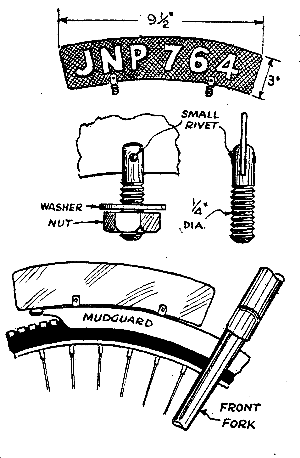
Fig.2 - Front Number Plate
Any old paint must be burned off, by placing the plates in a hot coal fire for a few minutes, or by use of a blowlamp. Do not allow the metal to become red-hot, and when cooled, mark out with a scriber the front and rear plates as shown at Figs 2 and 3 and cut out with tinman's shears. If the metal is rather thin the plates can be stiffened by allowing for a 1/8in turn-over at the edges, which may be tapped down with a small hammer on a vice-top. Smooth off all sharp edges with a fine file, and glasspaper and emery the surfaces clean; then mark out and drill the 3/16in. holes on the rear plate.

Fig.3 - Rear Number Plate
The sketches explain the fixings of the plates to the bicycle. The front plate is mounted on two 1/4in diameter bolts riveted at the lower edge, which protrude through holes drilled in the front mudguard top. The slot in the bolts in which the plate is riveted is cut with a fine hacksaw. The rear plate is simply held with two 3/16in bolts with a shaped hardwood block between it and the mudguard - see Fig. 3.
Before finally fitting the number plates to the machine they must, course, be painted black, two coats, with a good quality enamel. Make sure that this black paint is not a by-product of tar, otherwise the white paint lettering which will go on top will be discoloured. Use a fairly thick flat white paint for the lettering, put on with a sign-writer's brush, having a little turpentine handy to thin the paint as and when required. Two coats of white will be required for the numbers to cover the black paint.
It is important that the fuel mixture should be kept free from dust and grit when pouring into the petrol tank, and for this purpose a straining funnel should be provided. Sheet metal taken from a National Dried Milk tin is excellent material, and can be soldered up with the aid of an acid flux quite easily. Remember to glasspaper off the thin covering of paint from one side of the tin where the solder is to run. Approximate sizes to be cut with the shears are shown in the sketch; and a small piece of fine petrol gauze should be purchased (about 6d.) from a garage stores. Cut this to the necessary diameter and carefully solder in the bottom of the cone, after the lower tube has been soldered on. The edge of the gauze should be covered with a run of solder all round, but flux should only be added exactly where the solder is required, as the gauze takes up the molten solder very easily; careless soldering would soon clog much of the area of the gauze.
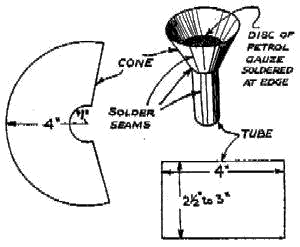
Fig.4 - Straining Funnel
Incidentally, it is advisable to mix the fuel - petrol with oil - in the open for safety. Much trouble may be avoided by using only the oils specified by the manufacturers of the particular engine, and in particular the right proportion of oil to petrol is most important. The writer knows of two instances where an excess of oil is being used with the petrol, causing smoky running, difficult starting, and more frequent decarbonising.
The writer's machine carries sufficient fuel for about 75 miles. On a long journey of, say, 50 or 70 miles out, it thus becomes necessary to refill before returning. Many garages, unfortunately, do not look with favour on the man who draws in for a mere quart of petrol and a few gills of oil which must be mixed with it before pouring into the tank! Again, some petrol stations use oil measures for this mixing job, which occasionally contain dirt and grit at the bottom which is a great danger to these small engines. A pint or so of extra petrol can be carried in a ('drop-off tank') bottle which may be thrown away afterwards.
A much better way is to make up a spare tank from a National Dried Milk tin as shown at Fig.5. This will hold nearly 3 pints of fuel. All the seams must be well soldered and the lid well fixed by running a bead of solder round the inside corner. After flux, a lump of solder may be dropped in the tin through the filler hole, and the tin held over a gas jet, slowly turning it round at an angle. The filler cap and body is taken from a screw-top tin, cut out and riveted and soldered in place. Make the small rivets from nails. The four strap lugs are made from 16 S.W.G. wire and soldered in place. Remember to wash off all acid flux after soldering, as this causes corrosion.
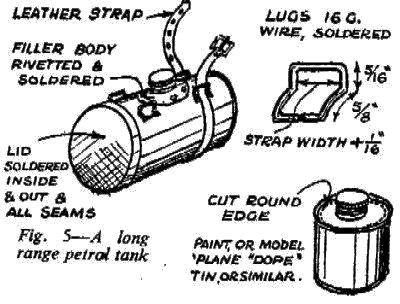
Two straps are provided which go right round the tank so as to hold it up under the crossbar of the bicycle. If the tank has a tendency to slip along the bar towards the rider, two extra lugs may be soldered on the front end of the tank and a small strap provided to loop round the steering column. It should be a simple matter to devise alternative means for carrying the tank on a ladies' machine, however.
The choke on the popular Cyclemaster 'Magic Wheel' can only be opened (after closing for starting up in cold weather) for normal running by stopping and dismounting. If a pull-wire, with a ring at the top end, is fitted to the small flange of the choke disc (Fig. 6) and carried up beneath and just in front of the saddle, it is a simple matter to pull the wire smartly, thus opening the choke without the delay of dismounting.
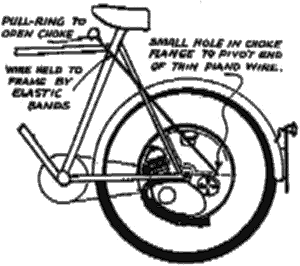
It will be necessary to turn the carburettor intake head round slightly if the line of pull is not quite right. This idea may be applied to other auxiliary cycle engines which do not provide any form of choke control without dismounting the machine.
First published in Hobbies Weekly on May 21st 1952
Reprinted in Buzzing, February, April, June & December 1998