 Go to the
Archive index
Go to the
Archive indexHaving read the very interesting article by Andrew Pattle in the April edition of Buzzing on the ‘ZAP’, I thought some readers may be interested in my own experiments and experiences in adding an electric motor to a bicycle. Also, perhaps for those who have contemplated doing the same thing, it may spur them on to having a go.
The idea of attaching a small electric motor to a bicycle has long been one of my ambitions. When cycling home from work, whichever route I took it was always an up-hill journey of varying gradients, and I vowed that one day I would fit a motor to give that little extra help as and when needed. It seems a bit ironic that, now I have retired from work, I have at last got round to doing something about it. However, it does mean that I now have more time to experiment, and enjoy the results.
Other design features considered desirable were that it should be simple, fairly unobtrusive, not cause any drag under normal cycling conditions, and not interfere with the normal gearing of the bike.
My first attempt was to use the motor to chain-drive a large diameter chain wheel attached to the spokes of the back wheel of the bike. After spending endless hours fabricating a suitable wheel out of a sheet of 3mm mild steel, and mounting it and the motor, etc, on the bike, the idea was tried out. However, due to excessive drag from the chain and drive when not power assisted, accompanied by a high pitched whine, like the sound of a cat in distress, from the freewheel motor sprocket, I decided to abandon this idea. My next attempt was more fruitful.
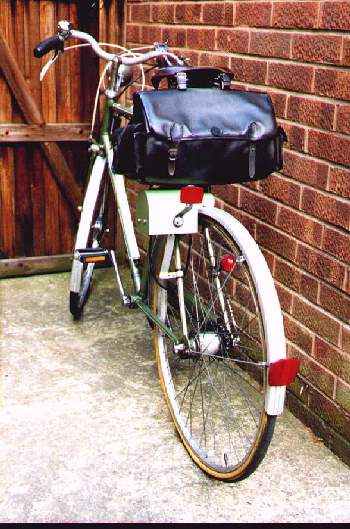
Incidentally, for those who may remember the bike model, it is a Raleigh Lenton Tourist (model 29), which was bought new for me in 1950! It has a 4-speed Sturmey-Archer hub gear, Dyno-hub lighting, Reynolds 531 tubing, and GB Sport brakes. A good touring bike of its day, and is still pretty much in its original condition. It has great sentimental value, having seen off most of my various cars that have come and gone over the years. A bit dated now, but still a good ride, and I consider more suitable for road use than many of the Mountain bikes one sees around today. At least it has mudguards!
A similar arrangement to a Mini-Motor was finally chosen for the basic design, ie: the motor shaft driving a steel friction roller directly above the rear wheel of the bike. For normal unassisted cycle use, the roller is held about a 1/4 inch clear of the tyre by a compression spring. When motor assistance is required, this is applied by squeezing the handle bar control. The action of this is twofold: first the motor is switched on using a micro-switch operated by the initial movement of the motor just prior to the roller being lowered on to the tyre. This helps to ensure a very smooth take up of motor power assistance; then further pressure allows the roller to grip the tyre. Just sufficient pressure is applied to prevent slip, and not excessive enough to cause undue strain and ware.
The motor is effectively held hinged at the back, to allow the front end of the motor and roller to move up and down, cable operated by the handlebar control lever. The motor is attached to the bike frame using brackets clamped to the seat stays. Rubber is used between the frame and all brackets to reduce noise, and also to prevent any damage to the frame.
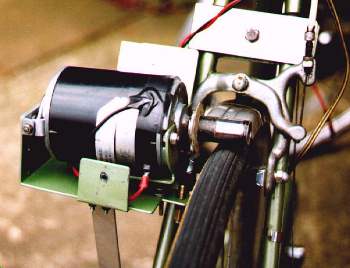
The roller used is ‘home made’ from a piece of steel tubing fitted over a composite centre to fit the motor shaft, which has a flat on it. Two grub screws secure the roller to the shaft. The surface of the roller is smooth. This gives good grip in dry weather conditions, and at the same time ensures minimum tyre ware. However, in wet conditions, it is pretty useless, and further experiments are to be carried out with a grooved roller surface to improve traction.
The handlebar control I used was off an old defunct Webb battery operated lawn mower. Nothing very special about this, and most brake, or clutch levers could be easily adapted for this purpose.
The motor operates from 12v to 24v DC, and is rated at about 1/4HP. This is only about a third of the power of a standard Mini-Motor so there is no chance of wheel spin on take off (even on loose gravel)!
The two batteries used are ‘Yuasa’ sealed lead acid type dry batteries, each of 12V. They are wired in series to give 24V output to the motor, and each battery has a capacity of 7Ah. They are carried in the Raleigh cycle bag attached the seat and seat tube, a bit heavy for this, but with reinforced saddle straps, it seems to cope quite well. There is still quite a lot of room left in the saddlebag for carrying other items.
The first question you might ask is: “Does it work?” and the answer to this is a definite “Yes”. It works very well (within the limits of the design brief above). I quite often travel part of the route I used to take when returning from work, and I can now much more easily tackle the inclines without having to get off before reaching the top! I would say that about half the LPA is now required with motor assistance applied, compared with when it is not. It is very effective, and I consider to be a well worthwhile add-on. Also, I must say after having ridden Mini-motors for some years, its quietness and absence of fumes and maintenance, does appeal (I must be getting old)!
And the second question might be: “how much will it cost?” Not quite so easy to answer this one, as a lot will depend on how adept you are at fairly straightforward engineering and ‘metal-working’. Also on what items you may have around. All the brackets and metal covers were home made from scrap sheet metal that was around and could be utilised.
The total cost of the motor and a pack of four batteries, including carriage and VAT was Ł55.77. The batteries were sold as ‘previously used’ and, whilst they all work, I do not really know how good they are in comparison with new ones. How long the batteries last on a run when fully charged obviously depends mainly on the severity and number of gradients encountered, and how often motor assistance is applied. I have recently been on a twenty mile sponsored cycle ride with some fairly steep inclines, with still some charge left at the end of the run!
The motor, Ref: MOT4, and batteries, Ref: YA1B, were obtained from Bull Electrical, 250 Portland Road, Hove Sussex, BN3 5QT. Tel: 01273 203500. They also have an article on electrifying a cycle, which I did not find very helpful.
Also available from Bull Electrical are Solar Batteries giving 13.8V output. Not sufficient power to drive the motor alone, but I am sure would be very useful in keeping the batteries topped up when parked. I intend to try this out in the near future.
I appreciate that the information given here is pretty general in terms of my own experiments and performance obtained. If anyone would like more details, or to compare notes, please give me a ring on 01623 621516. I will do my best to help.
Who knows, if there is enough interest we might even be able to have a section in ‘Buzzing’ devoted to Electric Bikes! Or would this be too controversial?
First published - October 1999