| Preparation. You can
splice any kind of 3-strand rope or cord. This example uses 12mm Nylon climbing rope but I
also splice ends into 3-strand polypropylene working ropes (12, 18 & 24mm) and 6mm
cord (useful for small tools such as secateurs, pruning saws etc).
The necessary tools required for the job are scissors (or Stanley knife), sticky tape
(any kind you like) and a cheap lighter for heat sealing the rope ends.
If using particularly large diameter rope or rope that is quite old you may need a tool
to help prise each strand away from the rope. See Swedish
Fid. |

|
 |
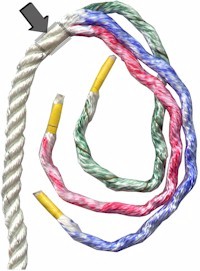
| Stage 1. Wrap a length
of sticky tape at a distance of approximately 300mm from the rope end (see arrow, I used
sellotape so you can see through at the lay of the strands, but any tape is ok).
Then unravel the three strands (the sellotape stops then unravelling further than we
require).
Wrap tape around each end to stop the fibres within each strand from separating, (can
also slightly melt the end of each strand with a lighter, to make threading even easier).
Note: The strands have been daubed with colour for illustrative purposes, there
is no need to do this on your rope!
|
|
|
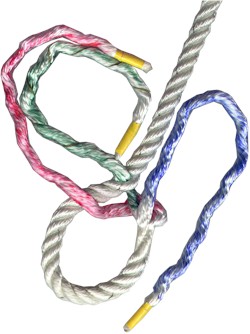
| Stage 2. Lay
the rope flat (as shown) and decide how big you wish your loop to be.
Position the three strands as shown and, at the position where you wish the loop to
terminate, feed the central strand through one coiled strand of the rope (to do this, you
need to gently prise a strand away from the coil without deforming its lay).
Note the direction the strand feeds through the coil, it must travel at right angles to
the laid strands and in a direction away from the loop.
|
|
|
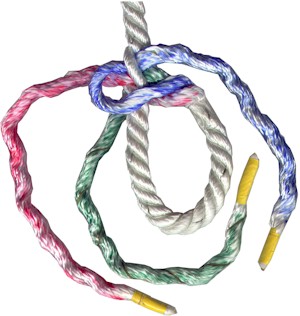
| Stage 3. Continue with
the second strand. Feed it through an adjacent strand on the coil.
Make sure both strands feed through at exactly the same point along the rope. |

|
|
| Stage 4. Now turn the
rope over and feed the remaining strand through the last strand of the rope. Again, it
must feed through at the same point along the rope so that all three strands lie
adjacent to each other.
Keep the same direction away from the loop, it may look odd at this stage but once
tightened will lay correctly.
The remaining stages follow in part 2.
Continue to Part 2.
|
|
|
| Please note, the guidance
contained within these web pages has obvious limitations. It is recommended that you
obtain proper instruction from a relevant training provider before using spliced ropes for
serious applications such as tree climbing etc. |
|
|
|