blank_8_8.gif (818 bytes)

Rope Splicing.   3-strand rope splicing:  Part 2

blank_8_8.gif (818 bytes)
Back to Part 1
blank_8_8.gif (818 bytes)
Stage 5.

Now start to pull all 3 strands through the rope evenly. Note how they are all aligned along the rope (the red is hidden at the back).

Its crucial to get the first weave correct so that all following weaves lay correctly.

Pull the three strands tight.

aie_splice6.jpg (14091 bytes)

blank_8_8.gif (818 bytes)
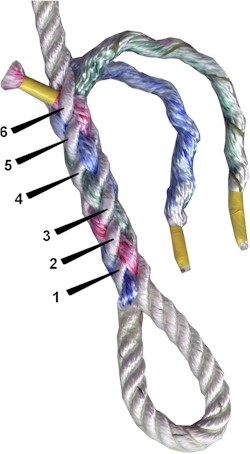
Stage 6.

Now continue to weave by threading each strand through one coil in turn. Do this by passing the strand over a coil and then under the following coil.

Once each strand has been threaded once, pull the weave tight by tugging on each strand in turn. Keep them as tight as possible.

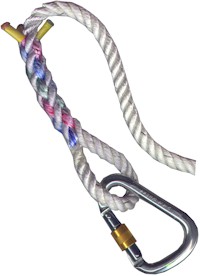
This picture shows the blue strand starting its second weave with the red strand already threaded twice.

aie_splice7.jpg (33055 bytes)

blank_8_8.gif (818 bytes)
Stage 7.

Continue weaving. Remember to keep the strands tight.

This picture shows 3 weaves completed for each strand with the red strand starting its fourth by passing over and then under a rope coil.


aie_splice7.jpg (37677 bytes)

blank_8_8.gif (818 bytes)
Stage 8.

Weaving is now complete. You need a minimum of 5 weaves for each strand, I've completed 6.

Trim each strand by leaving a stub of 25mm or so. I wrap mine with tape and then heat seal the end with a cigarette lighter to keep it neat and to prevent it from separating.


aie_splice9.jpg (27654 bytes)

blank_8_8.gif (818 bytes)
Stage 9.

The finished article.


Please note, the guidance contained within these web pages has obvious limitations. It is recommended that you obtain proper instruction from a relevant training provider before using spliced ropes for serious applications such as tree climbing etc.


Back to Part 1


aie_splicea.jpg (12271 bytes)

blank_8_8.gif (818 bytes)
Back to Knots Index.

© 2000 Chris Skellern. AIE.    Home  | News | A-Z Index  | Resources  |  Contact AIE  |  Terms of Use