Issue 4, June 1984 - Joystick Interface
| Home | Contents | KwikPik |
|
The way that Sinclair Research has
designed its joystick sockets on the
Interface 2 unit is for the sticks to
simulate the number keys; so '1' to '5'
are operated by Joystick One and '6' to
'0' by Joystick Two. Let's look at the
first diagram and see just what's inside
the standard Atari joystick.
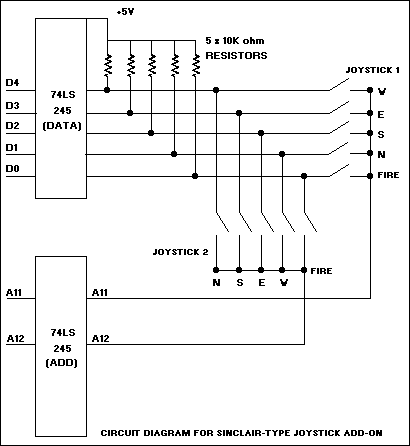
You'll find a set of five switches joined together by a 'common' wire. Four of them are controlled by the direction of the joystick and the fifth is the Fire button. Usually, only one of the direction buttons is in operation at any one time. ASSEMBLE MODEOnce you have your buffer board, all you'll need to buy are two nine-way 'D' type sockets - the ones which are standard for all Atari joysticks. First, wire up the address line (A11 or A12) to the common on the Atari socket (pin eight). You can get this from the spare hole beneath the IC socket. As a result, a binary zero on the data lines connected to the other sides of the switches can only occur when the number keys are being checked.The data lines must then be connected to the 'North', 'South', 'West', 'East' and 'Fire' connections on the socket. The socket is shown here from the pin side; there's plenty of room above the two ICs to mount the sockets, having first wired them into the board. The tracks to use are the ones above the straps which carry the data lines from one side of the board to the other. I would suggest, for single joystick operation, that you make use of the left-hand side joystick and that you secure the socket to the board with screws to make it easier to disconnect. Each of the data lines must be connected to a 10K ohm resistor, so that the normal condition of the joysticks is binary one (+5 volts). This is done to counter the capacitance effect that can easily result from using long leads. It's also worth doing this if you find that the keyboard 'locks up' - because the correct binary one signal is not strong enough. Any standard Atari joystick can then be plugged into the socket and the interface tested to see if it produces the correct numbers. If the numbers look wrong, check the connections to the joystick socket. An added extra is that the joystick may also be modified to fit any games which use a particular and specific set of five keys; just connect up the appropriate address line to pin eight. The final bonus is that Psion and Sinclair Research have been writing games that use this interface for some time now; check the tapes you have already - you might be surprised to find that they have joystick commands already built-in.
|

In our first issue, Stephen Adams presented his recipe for a DIY Speccy keyboard buffer. This month, under the guise of further expansion, he details how you can add Sinclair-type joysticks to the board. 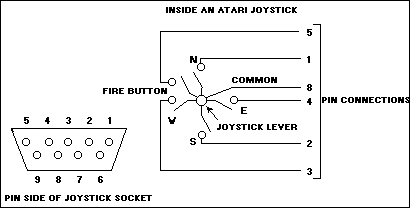
|
| Home | Contents | KwikPik |