|
Here
are some of the more common questions we are being
asked.
Q:
How do I identify my Athlon CPU ?
A:
Here is a typical Athlon serial number from the top
right of its plastic casing -
K7550MTR51B
C
219952603752
Here
we see we have a Athlon 550 ......the "C"
at the end of the first row indicates the core is
0.25 micron. If it was a 0.18 micron core the letter
would be "A"
The
next line contains more details about the CPU. The
"21" is the FAB number (the plant is was
manufactured at). The "99" is the year the
CPU was manufactured (this can also of course be a
"00"). The "52" is the week of
the year the CPU was manufactured (generally the
later the better)
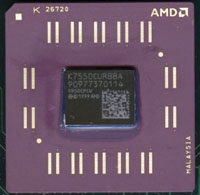
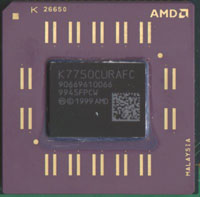
It
is also possible that some later Athlon CPUs may be
marked with a "C" for 0.25 micron but in
fact have a 0.18u core inside. There is however a
easy way to check without taking the Athlon to
pieces. Simply look up under the Athlon between the
heatsink plate and the PCB inside........you will be
able to see the size of the core. The two pictures
below show the difference between the two cores.
(thanks
to Magnus Rasmussen for the pictures)
The
core on the left is 0.18u ....on the right is a
older 0.25u core
Q:
How fast will my Athlon reach when overclocked ?
A:
This is the most common question we receive...and can
never be answered 100% accurately. At the end of the
day ALL Athlon CPUs will overclock enough to make it
very worthwhile. The following is only a rough summary
(we could write pages on this subject ......but most
of it would be pure speculation not fact :)
The
most common speed most Athlons reach is around the
750-850Mhz mark...of course faster Athlons can hit up
to 150Mhz above this.
0.25
micron Athlons -
Early
500s (sub week 42), generally hit around 650Mhz
Upwards
Later
500s (week 42 plus) generally reach 750Mhz Upwards
(with week 42 actually being the best due to it's high
speed 3.1nS cache)
Just
about all week 42 plus Athlon 500s have 650Mhz
cores......and as such clock very well.
550
and 650 Athlons vary depending on there age.......and
much the same speeds apply.
The
700Mhz Athlon was the last 0.25 core that AMD officially
released. This core usually hits between 800 - 850Mhz
on standard cache divider and 900Mhz with some
adjustment.
There
are a few 750Mhz 0.25 cores around, these were maybe
left over from before AMD decided to switch to the
0.18u process
and
have been known to reach up to 1Ghz :)
0.18
micron Athlons -
These
newer AMD cores have currently been seen in 550, 650,
and 750 cores......The 550 and 650 core generally
clock much the same as the older 0.25 cores......but
usually run cooler and require less Core Voltage.
The
750 core is a real gem and can hit 950Mhz+, if you
have one of these you are indeed very lucky
:)
For
more help on identifying the internals of your Athlon,
please check our this
site.
Q:
Why should I buy
a FreeSpeed Card rather than another make ?
A: We feel
FreeSpeed is by far the best card on the market for
the following reasons:
1. It's a full production unit made with Surface
Mounted components for ultra reliability.
2. It's not a prototype and hand built like others.
3. It's reliable, with a lifetime guarantee against
mechanical failure
4. It's the cheapest card on the market
5. It's the smallest card on the market (less than
half the size of a credit card)
6. Shipment is free, others charge up
to $30!
7. No soldering is needed
8. There is not a single wire on the unit (unlike
others), adds to reliability
9.
We deal with every one of our customers on a 1 to 1
basis, personally answering every enquiry.
10.
ISO Accredited Quality Control used during
manufacture.
Q:
Does
the FreeSpeed Card allow adjustment of the Athlon's
L2 cache divider ?
A:
FreeSpeed
only allows the adjustment of the Multiplier and
Core Voltage of your Athlon CPU. It is not possible
to adjust the cache via the Athlons edge connecter,
but can be adjusted with some tricky soldering. We
have found in our tests that adjusting the cache
divider is not always that helpful, and feel that
this feature is not worth the extra time the user
would have to spend fitting the card and the risks
involved in soldering.
Q:
How
will I fit my heat sink to my Athlon if the casing
has to be removed ?
A:
The only part of the casing that has to be
removed is the plastic section on the back. The heat
sink plate remains untouched. The FreeSpeed Card
itself sits vertically on top of the Athlon, so as
to keep out of the way of Cooling fans / Sub Zero
cooling systems etc..
Q:
Can my FreeSpeed card set the Athlons core voltage
above 1.9V ?
A:
The reason we have never made
available this information is that it is very rarely
needed.....and in fact, without some pretty extreme
cooling methods it could be very dangerous for the
life of your Athlon. There are also some lower than
1.45V settings but it's not worth mentioning these
unless you are heavily into underclocking ;)
Here
is the unpublished core voltage settings .....please
only use these if you have extremely good
cooling and are prepared for a possible CPU meltdown
:)
| Core
Voltage |
Switch
9 |
Switch
10 |
Switch
11 |
Switch
12 |
| 1.95V |
on |
off |
on |
on |
| 2.00V |
off |
on |
on |
on |
| 2.05V |
on |
on |
on |
on |
Q:
How
do I adjust my Cache Divider ?
A: Please note that adjusting your cache
is a very tricky operation, and unless you feel you
have good soldering skills, it should not be
attempted. The gains you may get are also not always
worth the slow down your CPU gets from having slower
cache and the extra heat you will need to get rid of
from having a higher core speed.
Also
always double check your existing cache arrangement
to see which you have. Our Athlon 700 was using the
same as a 500.
This
table is also slightly misleading as it is arranged
to show operational high / low, rather than showing
resistor in / out. This means that a "0"
denotes a resistor in place and "1"
denotes resistor absent.
| Athlon
L2 Cache Frequency Ratio Setting (resistors
are at the top middle of CPU on the non-core/cache
side) |
| |
| Ratio
at MHz: 500/550/600/650 |
Ratio
at MHz: 700/750 |
|
R111 |
R107 |
R104 |
R102 |
|
R110 |
R106 |
R103 |
R101 |
|
R112 |
R113 |
| - |
- |
0 |
0 |
0 |
0 |
1 |
1 |
1 |
1 |
0 |
1 |
| - |
- |
0 |
0 |
0 |
1 |
1 |
1 |
1 |
0 |
0 |
1 |
| - |
- |
0 |
0 |
1 |
0 |
1 |
1 |
0 |
1 |
0 |
1 |
| 1/3 |
- |
0 |
0 |
1 |
1 |
1 |
1 |
0 |
0 |
0 |
1 |
| - |
1/3 |
0 |
1 |
0 |
0 |
1 |
0 |
1 |
1 |
0 |
1 |
| 1/2 |
- |
0 |
1 |
0 |
1 |
1 |
0 |
1 |
0 |
0 |
1 |
| - |
1/2 |
0 |
1 |
1 |
0 |
1 |
0 |
0 |
1 |
0 |
1 |
| - |
2/5 |
0 |
1 |
1 |
1 |
1 |
0 |
0 |
0 |
0 |
1 |
| - |
- |
1 |
0 |
0 |
0 |
0 |
1 |
1 |
1 |
0 |
1 |
| 2/5 |
- |
1 |
0 |
0 |
1 |
0 |
1 |
1 |
0 |
0 |
1 |
| - |
- |
1 |
0 |
1 |
0 |
0 |
1 |
0 |
1 |
0 |
1 |
| - |
- |
1 |
0 |
1 |
1 |
0 |
1 |
0 |
0 |
0 |
1 |
| - |
- |
1 |
1 |
0 |
0 |
0 |
0 |
1 |
1 |
0 |
1 |
| - |
- |
1 |
1 |
0 |
1 |
0 |
0 |
1 |
0 |
0 |
1 |
| - |
- |
1 |
1 |
1 |
0 |
0 |
0 |
0 |
1 |
0 |
1 |
| Off |
- |
1 |
1 |
1 |
1 |
0 |
0 |
0 |
0 |
0 |
1 |
0
= Signal is Low = With a resistor on the PCB
1 = Signal is High = Without a resistor on
the PCB |
The
settings in this table are from Goma's Hardware.
Fluke
|
